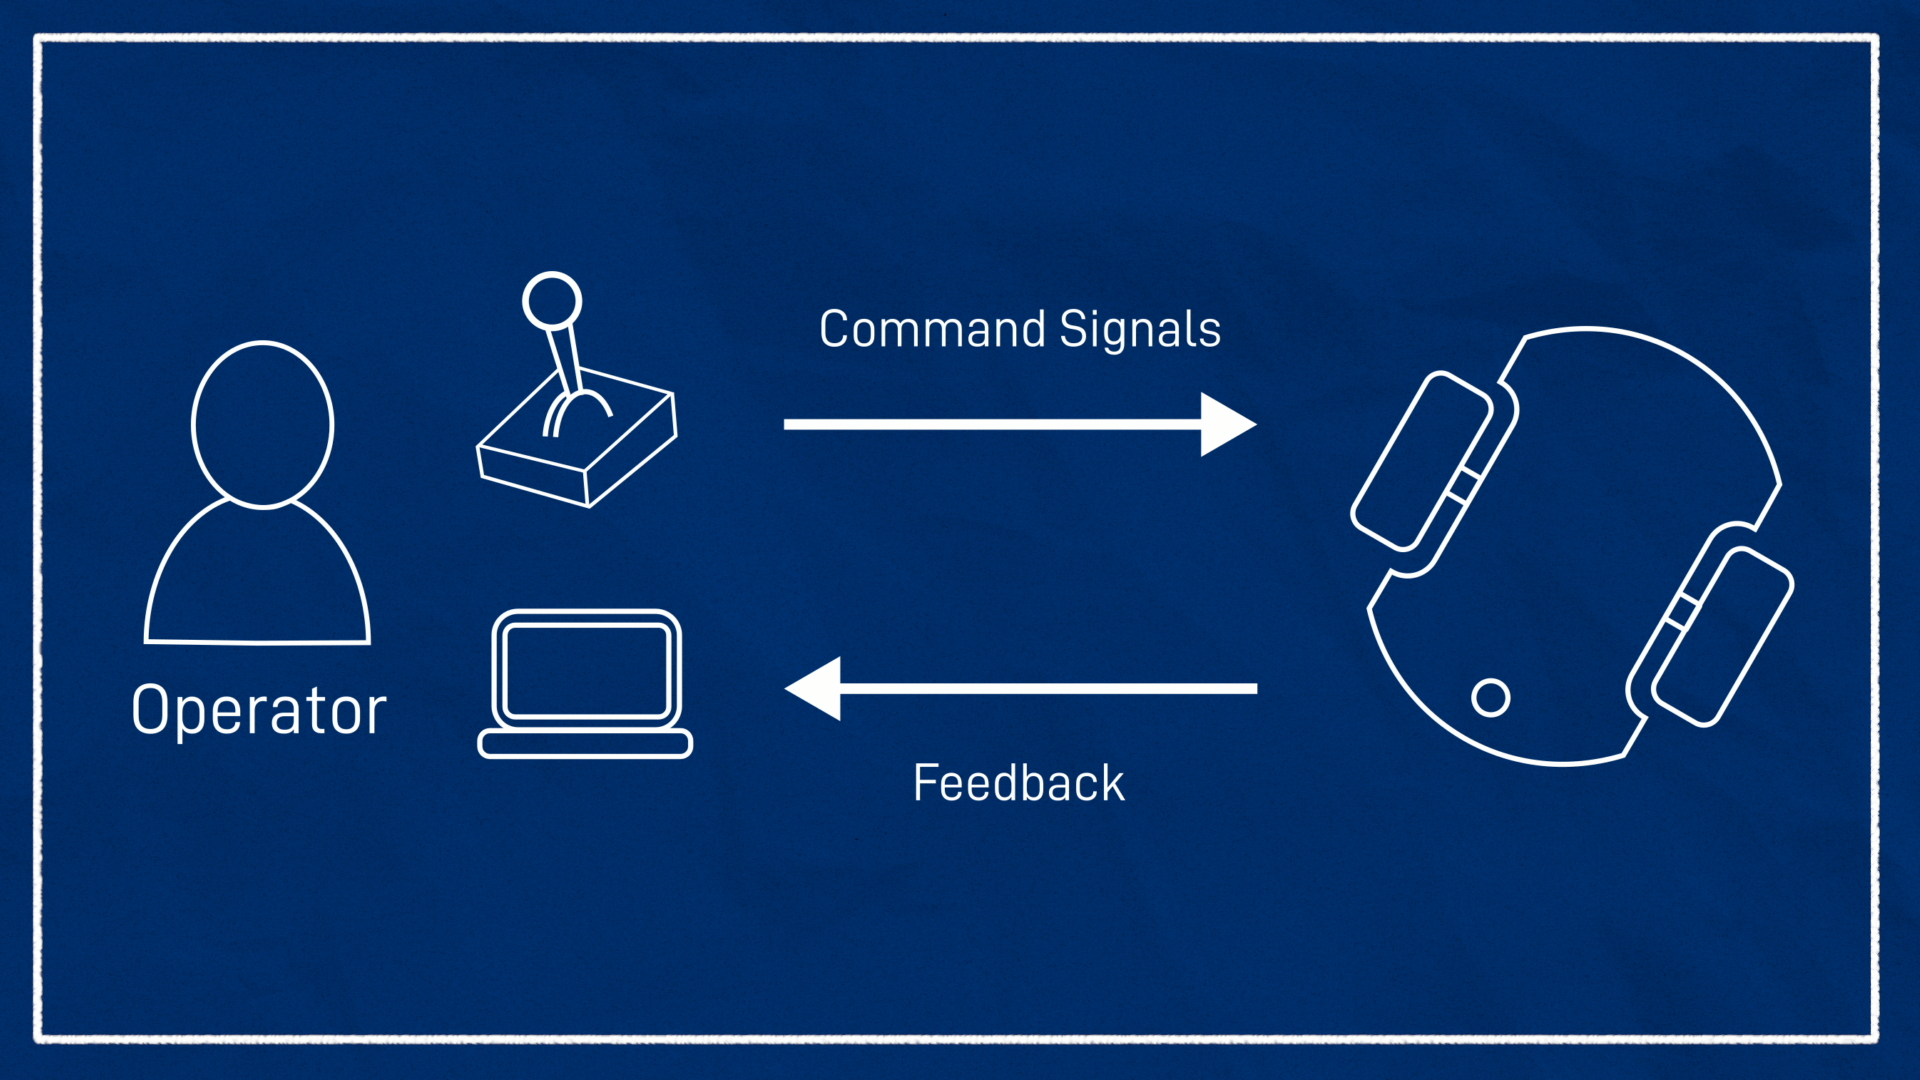
Teleoperation
What is teleop?
Just like television and telephone mean distance vision and distance voice, teleoperation refers to controlling a robot from a distance, remote control. This is in contrast to autonomous operation, where the robot is given a task which it goes off and completes itself.
Although we like robots to be as autonomous as possible, in many instances human control is still required, especially during development or configuration.
Teleoperation usually consist of two parts:
- A way to send command signals (typically velocities) TO the robot
- A way to receive sensor data FROM the robot (this may be optional if you are physically present with the robot)
We have already seen an example of teleoperation in action. In the previous tutorials we used teleop_twist_keyboard to send Twist messages to our robot and we used rviz to view the camera and lidar feed it sent back.
It doesn't take long to realise though, that it’s not a very practical approach. The keyboard:
- Only gives coarse control
- Requires terminal window to be kept open and active
- Isn't very "portable"
All of this can sometimes make for a less-than-comfortable teleop experience, so we’re going to explore some other options we have to improve things!
Handling Multiple Control Sources
Before we actually implement gamepad control, there is an important step we need to take that will affect all kinds of control for our robot. In a live system we may have simultaneous competing inputs for the command velocity - e.g. the system may be autonomously navigating, but also a human operator may want to intervene, and that should take priority. There is a node to handle this called twist_mux (twist multiplexer).
To avoid clashes, each possible command source will be on its own topic (e.g. /cmd_vel_nav, /cmd_vel_joy). Then twist_mux will take each of these, determine which is the most appropriate based on a set of rules, and output that one to /cmd_vel for the controller to use.
We can install it with:
sudo apt install ros-jazzy-twist-mux
To enable twist_mux we have three changes:
- Add it to our two launch files (sim and real)
- Create a new config file called
twist_mux.yamlthat enables stamping and sets up a topic for the keyboard twist source - we will add more later.
1
To check things are still working, rebuild and then launch launch_sim.launch.py, and in a second terminal run the following command. Note that we are now remapping the output topic to /cmd_vel_keyboard, and also specifying the reference frame ID and to use sim time. Our example should work ok without these last parameters, but better to get them right.
ros2 run teleop_twist_keyboard teleop_twist_keyboard --ros-args -p stamped:=true -r /cmd_vel:=/cmd_vel_keyboard -p frame_id:=base_link -p use_sim_time:=true
If all is working, our robot should still drive around and you can ros2 topic echo the two command topics to see the data on both.
Using a Gamepad
What is a gamepad?
You're probably familiar with gamepads - also known as game controllers. They're usually used for playing video games and are a compact and ergonomic way of controlling many buttons and axes. This tutorial will (try to) avoid using the term "controller" to minimise confusion with the controllers used by ros2_control, but it will sometimes use the word "joystick", which is used by ROS and Linux to refer to all game controllers, not just actual joysticks (which are one large stick, gripped with a hand).
Gamepads generally fall into three main categories:
- Wired (USB)
- Wireless (USB)
- Bluetooth
Each has their pros and cons. Of course within each of these is a whole range of options with different features at different price points.

I personally prefer USB controllers (wired or wireless) to avoid pairing issues that sometimes occur with Bluetooth, especially when pairing to a robot with no GUI available for easy reconfiguration. Also, I prefer the ergonomics of the Xbox controller rather than PlayStation style, but everyone has their own preference.
The gamepad I used in the video is a cheap, wireless USB one (pictured centre above). If you want to get it, be warned that it is not a great gamepad: the thumbsticks have poor sensitivity, it constantly goes to sleep and needs to be woken up, changing the batteries is a pain... On the plus side though, it is cheap, wireless, and works out of the box with ROS, so it's worth picking up if you don't have an alternative.
Why use gamepads for robotics?
Gamepads are great for robotics because they’re already designed to easily direct something to move around, it’s usually just a virtual something. They typically have a few different axes and a whole lot of buttons, enough to trigger any functions you'd require.
With ROS, we can also decide whether we want to connect the gamepad directly to the computer in the robot, or to our base station/development machine. Connecting to the dev machine makes it easier when swapping from simulation to the real robot because you don’t change anything, but you’ll get better performance (with lower latency) connecting to the robot. There’s nothing stopping you from setting up both, but this tutorial assumes everything is connected to the dev machine the whole time. If you want to do it the other way just remember to edit the files and run the commands on the Pi instead.
Gamepads in Linux
Most ROS users will be running Linux, which generally has ok support for gamepads (though not quite as good as Windows, since Linux doesn’t have a history of being game-focused, something Valve is making huge leaps in changing).
So our first step is going to be checking that the gamepad actually works in Linux. Without going too deep into it, there are two different underlying interfaces that Linux can use to handle gamepads, the “old way” and the “new way”. For the most part this isn't something we need to know about, and all the examples in this tutorial will use the “new way” underneath, but in the next tutorial there will be some extra info about the old way, in case your situation requires it.
To check our gamepad works in Linux, we want to install some useful tools:
sudo apt install joystick jstest-gtk evtest
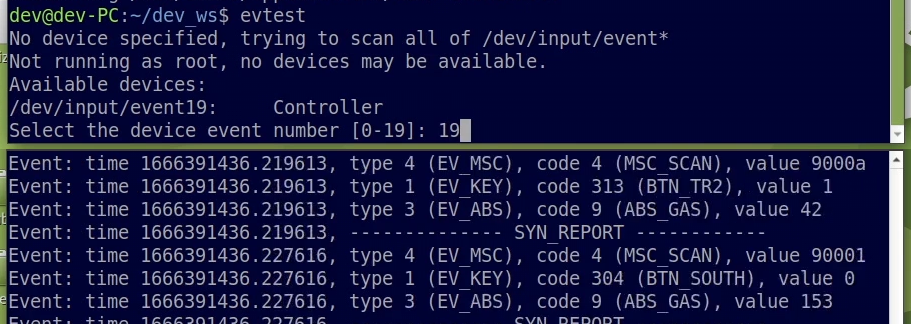
With the controller connected (e.g. via USB or Bluetooth), we can open a terminal and run evtest. It will ask for the event number (it helpfully tells you some options), and after proceeding, any button presses should cause some new text to come through on the screen.
You can also experiment with jstest and its graphical counterpart jstest-gtk (which is pretty nice), but just be aware that they are using the old driver underneath.
Connecting to Joysticks/Gamepads in ROS
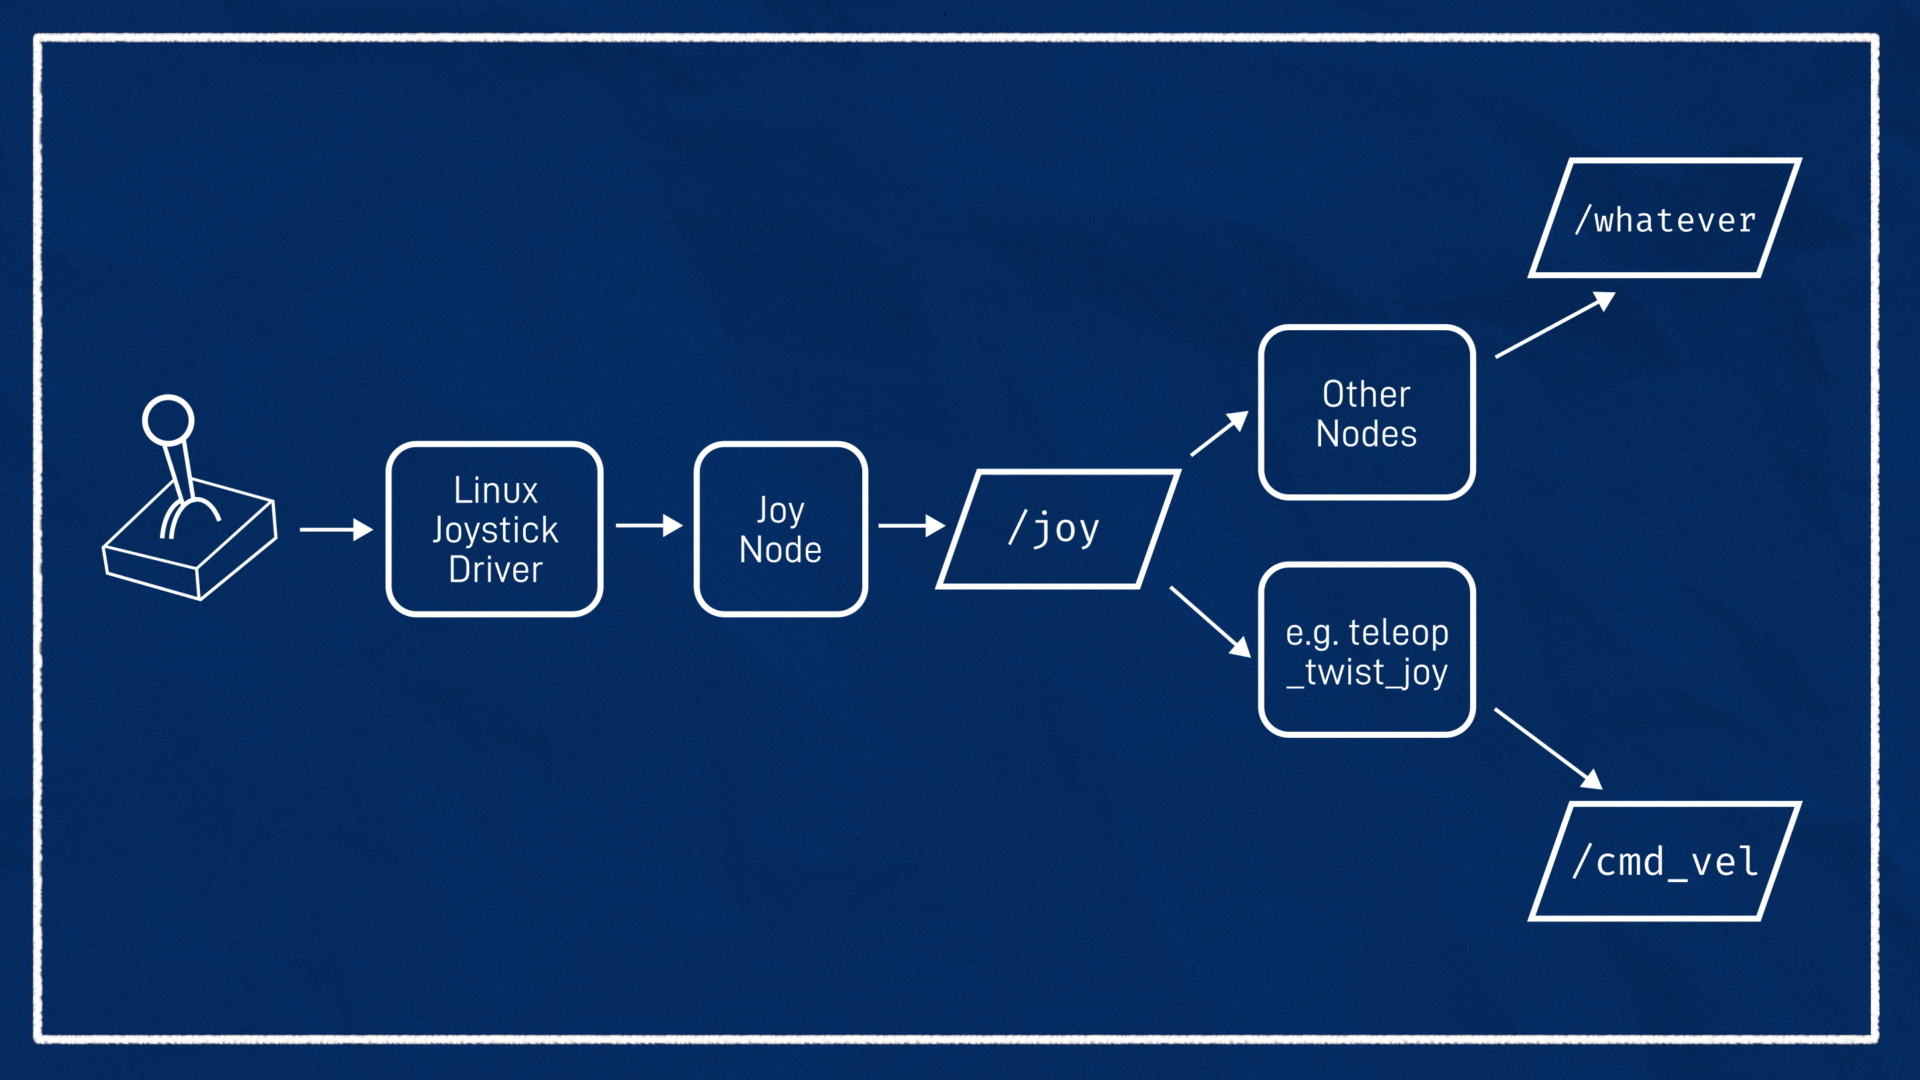
Once Linux can see the gamepad, we need to get it into ROS.
ROS comes with some packages that make working with gamepads and joysticks really easy. Rather than just running one program that generates Twist messages directly (like teleop_twist_keyboard), the process is split into two. The first program communicates with the joystick through the Linux drivers and publishes a sensor_msgs/Joy message - essentially a list of which buttons and axes were pressed at that time. This data can be used by other nodes to drive behaviour (e.g. trigger a service when a particular button is pressed, or use an analog stick to steer a camera with a servo). What we’ll be using it for soon is to pick out the thumbstick values and publish an appropriate Twist message.
Although splitting things up might seem more complex, it means that we don't need to rewrite the Twist calculations for every joystick out there, and we don't need to rewrite the joystick driver code for every possible application.
Let's first install the new nodes:
sudo apt install ros-jazzy-joy ros-jazzy-teleop-twist-joy
To listen to a joystick with the new drivers, we can use the tools from the joy package. The first one will tell us which controllers ROS can see:
ros2 run joy joy_enumerate_devices

We usually want to use controller 0 (note that this ID is different to the one in evtest) which is the default, so for now there no need to specify parameters when we run the joy node (we will look briefly at some of the parameters in the next tutorial).
I tried testing with two gamepads plugged in and actually had trouble specifying the second one and could only get it to function correctly with device 0.
Now we can open up two terminals to run the two commands below - the first is running the node and the second is displaying the outputs.
ros2 run joy joy_node # <-- Run in first terminal
ros2 topic echo /joy # <-- Run in second terminal

If everything works correctly, we should see messages coming through on /joy as we press the buttons and move the sticks.
Bonus: A nicer way to check joysticks
Echoing /joy is good for checking that the gamepad is working, but it isn't always easy to tell exactly what’s going on, especially counting which axis is which. I couldn't find any other obvious tools out there for this so I wrote a simple one myself. You can install it with:
sudo apt install ros-jazzy-joy-tester
Once installed, it can be run with:
ros2 run joy_tester test_joy

This is a good opportunity to note down which axis we want to use for driving forward and backwards, which one is for steering left and right, and also the two buttons we want to use for selecting which speed mode to use - more on that soon.
Creating a launch and params file
Before we go any further, we’re going to create a launch file and a params file for running our gamepad control. That’s because the next node we’ll be running has a lot of parameters to specify, and typing them all in at the command line will be tedious.
We’ll start with the launch file. Create joystick.launch.py in the launch directory, and copy-paste the launch script below. This script simply:
- Specifies the path to a params file
- Declares a joy node that uses the params file
- Launches it
Then we also need to create config/joystick.yaml. The parameters specified below are only a subset of the full parameter list but they are ones we are more likely to change. The values shown here are actually the same as the defaults, but they are there to change if we need to. We'll learn a bit more about them in the next tutorial.
1
After a rebuild to add the new files and sourcing our workspace, we should be able to launch joystick.launch.py and get the same behaviour as we did running joy_node directly.
Converting Joy to Twist
Now that we have our raw joystick data coming through on /joy we need to convert it to a TwistStamped message on /cmd_vel_joy (to feed into twist_mux). The package we use for this is called teleop_twist_joy.
Although we can run it at the command line with ros2 run, there are so many nested parameters to set that it’s not worth it unless we trying to troubleshoot something. Instead, let’s add it straight to our launch file and we’ll pass the parameters using the same joystick.yaml file as earlier to keep things simple.
First, the changes to the launch file:
1
The example code above explicitly names the node teleop_node. This is because the default "node name" (that we need to set the parameters properly) doesn’t match the "executable name" which, while technically fine, is quite confusing. By explicitly naming it, we force everything to line up.
Now for the parameters. For each of the six dimensions of the Twist we can specify:
- Which joystick axis to use
- Max speed in regular mode
- Max speed in turbo mode
Keep in mind that our differential drive robot controller can only move in linear X and angular Z, so we only need to set those.
We also need to set which button enables regular mode, and which button for turbo mode. Having separate regular and turbo speeds gives us finer control over the robot, especially if your joystick sensitivity is poor or you’re just using the D-pad.
Finally, we have the option of disabling the “dead-man's switch”. By default, you need to keep the regular or turbo button held down while moving the joystick to send commands, so that if something bad happens (e.g you drop the controller and the thumbstick gets bumped), it won’t send any motion commands. This is enabled by default, and the parameters below keep it that way, but you can change it if desired.
So we’ve got axis_linear, scale_linear, scale_linear_turbo, then the same for *_angular_*. Inside all the linear ones we want to set what it is for the x dimension, and in the angular ones we have yaw (note that it is roll, pitch, yaw here even though the resulting Twist message will refer to the angular axes also as x, y, z). Finally we’ve got the require_enable_button, enable_button, and enable_turbo button.
The example below sets the regular speeds to 0.5 (m/s and rad/s) and the turbos to 1. These are decent defaults and you can tweak them now or later if required. If you can’t remember your axes or button numbers that’s ok, just have a guess so that we can get this to run, and then you can rerun the test tool to confirm it later.
1
Before we rerun everything, we need to add our new topic to the twist_mux config:
1
With all of this built, we can relaunch joystick.launch.py (ideally with use_sim_time:=true although it doesn't seem to care) and in another terminal, run ros2 topic echo /cmd_vel_joy to see the values coming up.
Then, running the simulator, we should find that if we move the sticks by themselves there should be nothing, when we hold the regular speed button down, we should get those regular speeds, and likewise the higher speeds with the turbo button.
Finally, we can also run the keyboard teleop and we should see that if we start driving with the keyboard and then, while still holding keys, engage the gamepad, we should find that whenever the enable button is pressed, the gamepad has priority and can be used to drive the robot. Then once we let go of the gamepad enable, the keyboard will take control again. There are more complex locking and priority features of twist_mux but we won't be using them in these tutorials.
Driving the robot
Now that we are generating command velocities, let’s check that they work with the robot. The safest way to do this is to test first in Gazebo, then with the real robot propped up, then with the robot on the ground.
Getting feedback
The other half of teleoperation is feedback - making the robot's sensor data available to the operator. When we’re using ROS, our first port of call for feedback is of course going to be RViz - we can use it to display just about anything we need. That’s not to say it’s always the best option - some applications will require custom tools, and there are other general purpose viewers available like Foxglove (which we'll explore in the next tutorial), which are quite good.
The examples below are assumed to be in RViz.
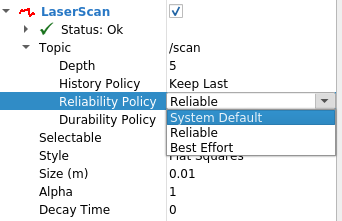
QoS
Before looking at these examples, it's worth a quick note about QoS. Quality-of-Service (QoS) is a feature of the ROS messaging system that allows nodes to control some technical aspects of how they send and receive data. Depending on the settings of both the publisher and the subscriber, messages may or may not be getting through. If you are having trouble getting something to show in RViz, the first thing to check is the QoS settings, and particularly try setting the reliability to Best Effort. If QoS is restricting you, there should be a warning printed in the RViz terminal window.
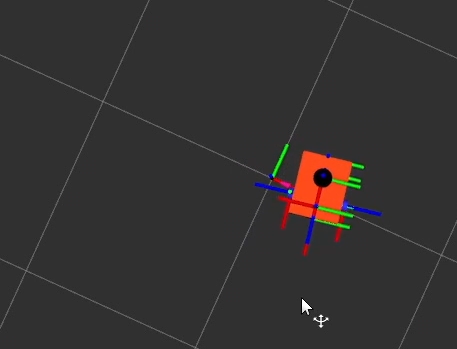
Odometry
The first feedback we get for free is our odometry (from the motor encoders, via ros2_control). By watching the robot model (or the axis markers) in the 3D view we get a rough sense of where our robot is moving. However, we have no understanding of the environment and odometry is prone to drift over time, so it’s not that useful on its own.
Camera feed
One of the more natural kinds of feedback is of course the camera, as this mimics what we see with our own eyes. We can open an Image display in RViz (or a Camera display).
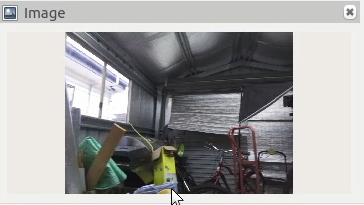
Unfortunately, something you may notice is that the image feed in RViz is choppy and delayed. This is because (I think) in Foxy, RViz doesn’t use image_transport to subscribe to images, which means it doesn’t know how to use compression, and so the image feed takes up too much network bandwidth from the Pi. This should be fixed in newer versions of ROS, but in the meantime we can just look at images in other ways, e.g. with rqt_image_view.
You may also find that reducing the framerate in the camera driver helps. For teh v4l2_camera node used in these tutorials, this can now be done with the time_per_frame parameter which takes an array of two integers to create a fractional interval (e.g. [1, 30] = 1/30s = 30Hz).
Note, I have found huge inconsistencies with the ability to stream images, especially in areas of busy WiFi. Some times, in some places, it works great, other times many frames are dropped.
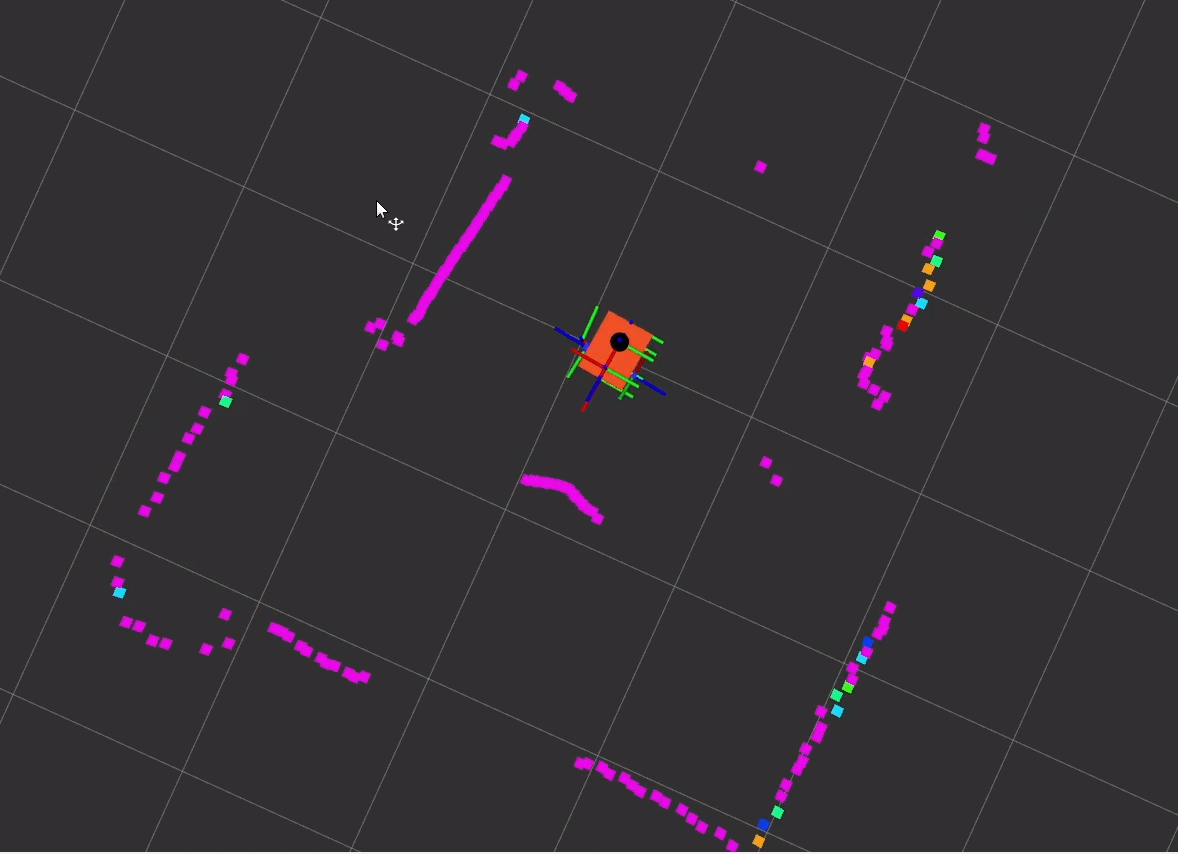
Lidar feed
The other sensor we have on our robot is lidar. By monitoring the lidar feed in RViz we can get a pretty good sense of the robot's location in indoor spaces, especially corridors.
Other feedback and alternative viewers
Depending on your sensors and algorithms there may be other data that is desirable to display. For example, if you are running a SLAM algorithm that is generating a map, visualising that would be helpful.
More creatively, we could set up feedback through other senses such as sound (e.g. beeping when close to an obstacle or even passing data from a microphone), or touch (e.g. haptic feedback, or "rumble", on a controller).
There are also other tools available for displaying our data, some of which we'll explore in the next post.
Conclusion
Now we are able to drive our robot around with a gamepad and use RViz to receive feedback. Take some time to have fun driving it around!