ROS Overview
A broad overview
The purpose of this tutorial is not to provide an in-depth explanation of how to use the various aspects of the ROS infrastructure. Instead, it is a broad overview of some key concepts that will be referred to in the other tutorials in this series.
1. ROS Distributions
Although ROS stands for Robot Operating System, it is not actually an OS, but a set of common libraries and tools on which to build more complex robotic systems. New ROS versions (or distributions) are released in May each year, and are designed to run on the most recent LTS Ubuntu. Although ROS can run on other Linux distributions (and even Mac/Windows), it is best supported on Ubuntu and a beginner should definitely start there. The development of ROS is overseen by Open Robotics.

In recent years the project has undergone a significant upgrade, and newer releases come under the name "ROS 2". A significant portion of the documentation and tutorials available online is for the original ROS (now sometimes called ROS 1), however ROS 1 will no longer be receiving updates and so these tutorials will focus on ROS 2 (specifically LTS releases, running on Ubuntu).
When reading ROS 1 documentation, it is helpful to be aware that although most of the concepts have remained similar, the actual commands and programs for ROS 1 generally won't work on ROS 2 and vice versa.
For more information on ROS 2 distributions, see REP 2000 - ROS 2 Releases and Target Platforms.
2. Nodes
A ROS system is made up of a bunch of smaller programs that all run at once and talk to each other. Each of these programs is called a node. A ROS node is very similar to any other command-line program, except that it is able to utilise the ROS libraries, and other parts of the ROS ecosystem will be aware of it. A node is typically designed to perform one specific task as part of the larger system. Some example tasks a node could perform are:
- Reading data from a sensor
- Sending control signals to a motor
- Receiving operator controls from a joystick
- Displaying a visualisation to an operator
- Computing a trajectory to follow
Each ROS node on a computer, and on other computers on the same network, all form part of a ROS network where they can "see" each other. This gives us a huge level of flexibility as we can just as easily develop systems that run entirely on a single machine, or with components distributed between different machines.
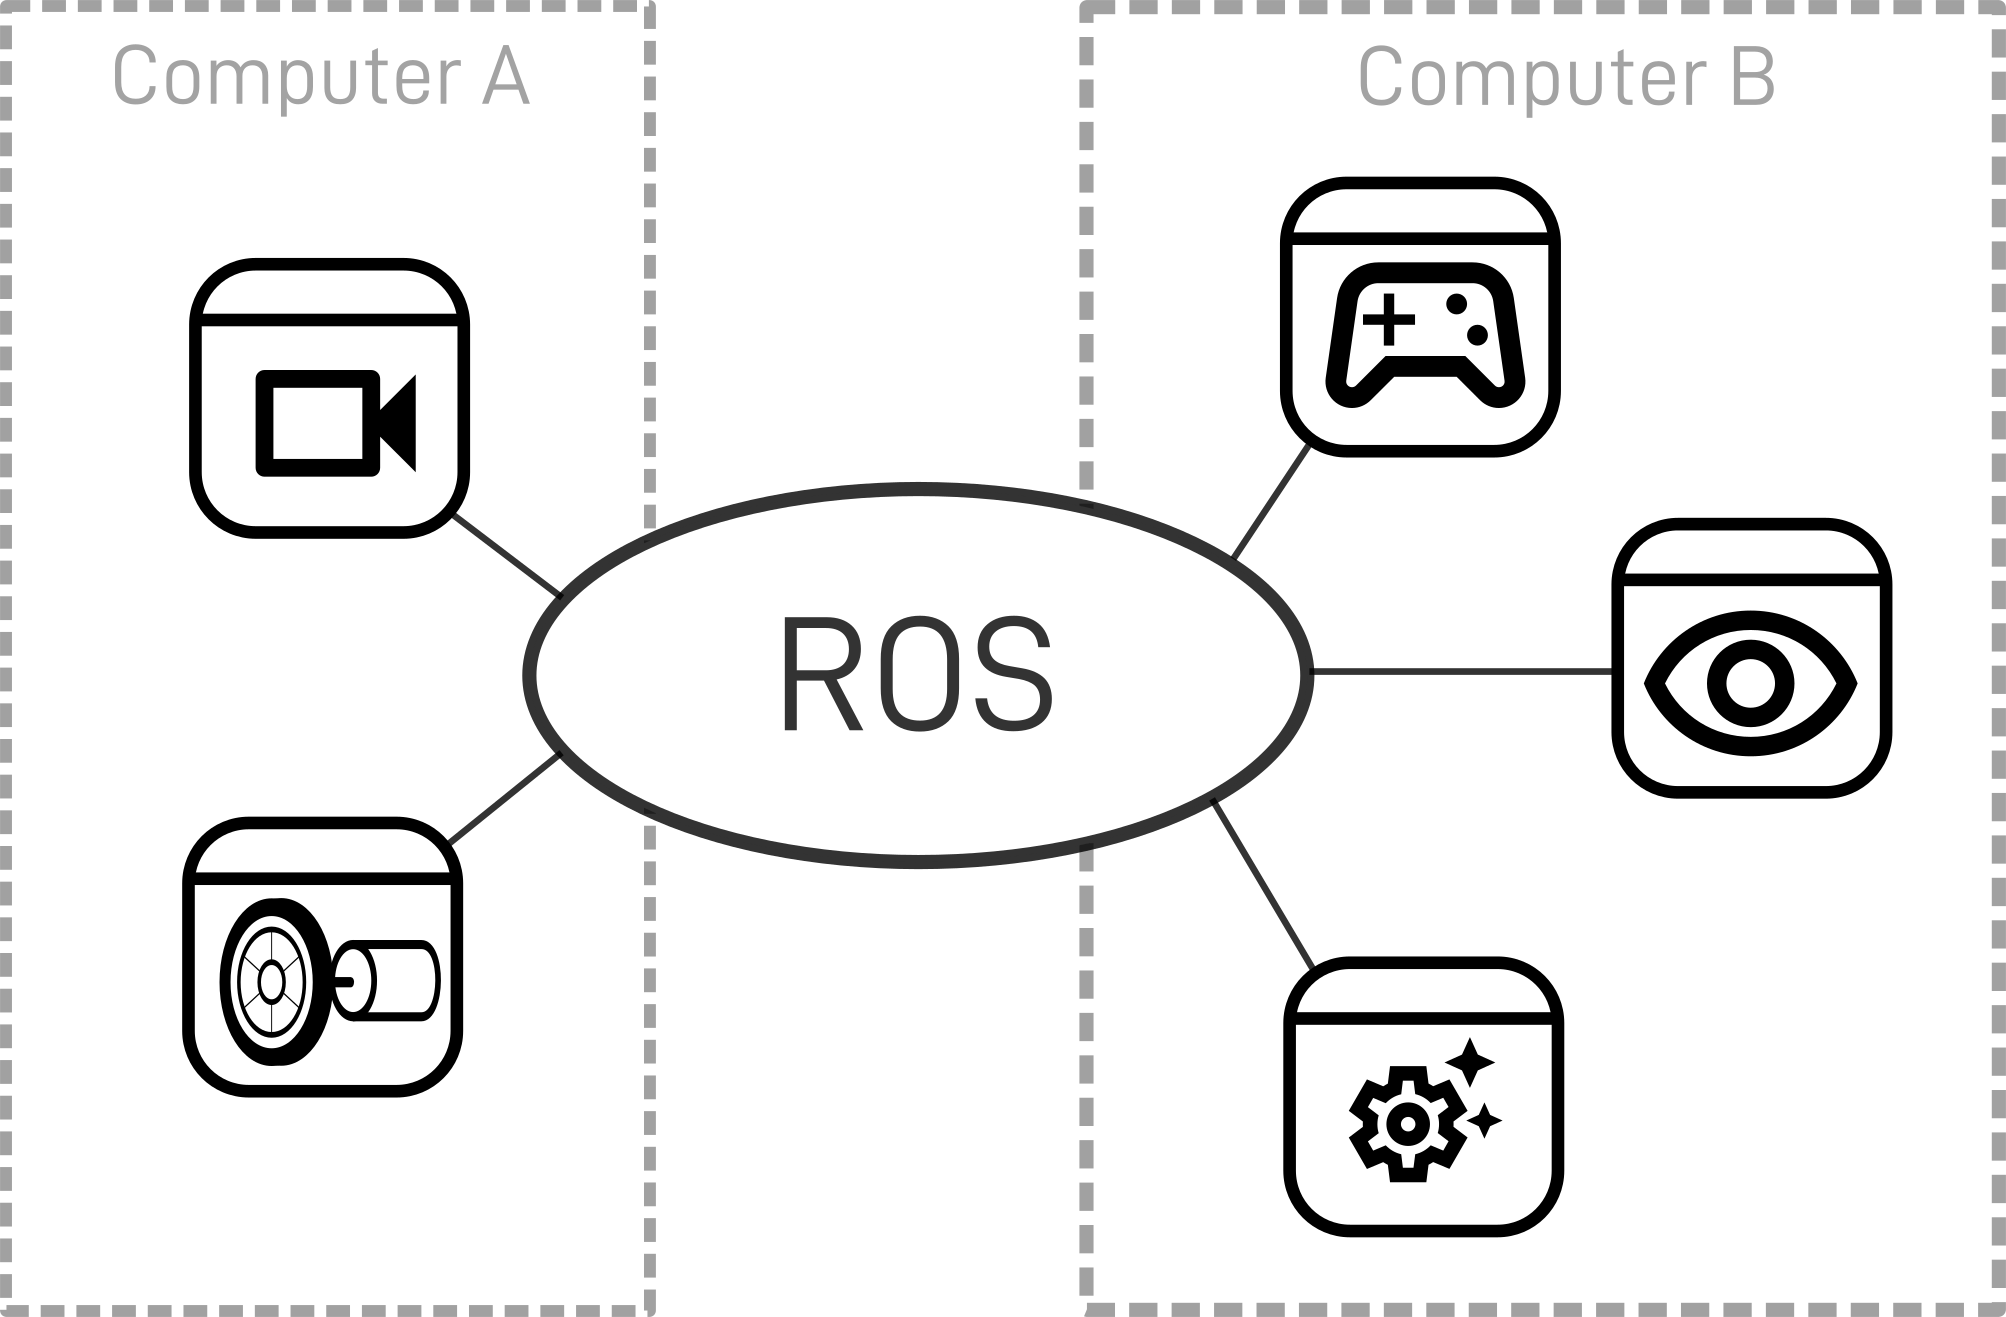
Two ROS commands we need to learn to work with nodes are:
ros2 run <package_name> <node_name>- To run a node (we'll talk more about the package name later)ros2 node list- To see all the nodes currently running on our network
In the example below, I have an RPLidar A1 connected to a Raspberry Pi (called "robot"), running the driver node rplidar_node, which is part of the package rplidar_ros. We can see that a second computer (called "dev"), knows that this node is running, even though it's on a different computer.
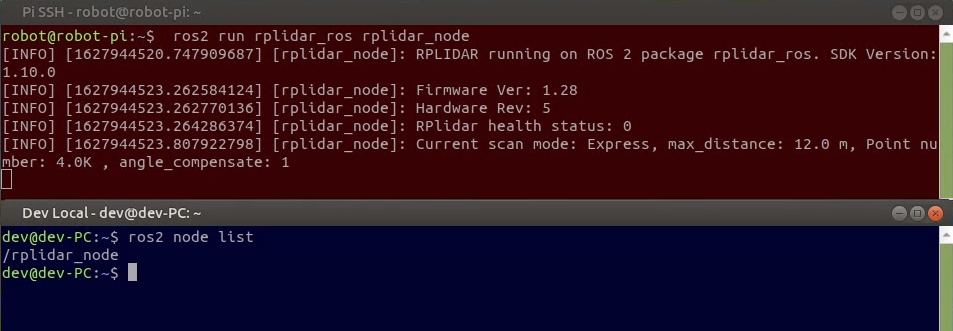
Note that these examples are using an older version of the RPLidar Driver. The latest version utilises a new ROS 2 design pattern called composition, which is a bit more complicated and will be covered in a separate tutorial. These examples are to help understand the ROS concepts, not to be a tutorial on connecting to lidars (which will also be covered separately).
3. Topics and Messages
The way ROS nodes communicate with each other is with topics and messages. A topic is a named location that one (or occasionally multiple) nodes can publish a message to. These nodes are called publishers, and other nodes (called subscribers) can subscribe to the topic to receive them. As mentioned above, when we use topics we don't need to worry about whether the publisher and subscriber node are even on the same computer or not, ROS takes care of that for us! All we need to do is specify the name of the topic, and the type of message that will be published. A node may be a publisher for one topic, and a subscriber for a different topic.
The topic system is great because it lets us write smaller, simpler nodes that are good at one thing, and can communicate with each other to solve larger problems. For example, the rplidar_node only needs to know how to talk to the laser hardware and publish a LaserScan message, it doesn't care what anyone else does with that message afterwards. Likewise, a node that utilises lidar data doesn't need to know how to communicate with every different lidar model out there, it just needs to subscribe to a topic with LaserScan messages.

Two useful commands for working with topics are:
ros2 topic list- See all the available topics being published toros2 topic echo <topic name>- Pretend we are a subscriber and see the messages being published
In the example below, you can see that the rplidar_node we ran earlier is publishing to the topic /scan.
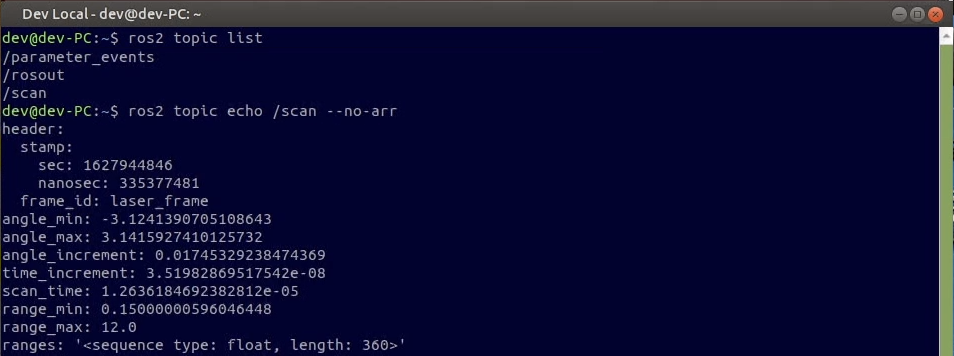
Take a look here for more information on how topics and messages work.
4. Services
Unlike topics, which allow a node to share many messages to anyone who cares to listen, services offer a single request/reply communication from one node to another. The content of the reply may be useful information, such as the result of a calculation, or it may just be an indication that the request has been received.
To use our lidar as an example, while operating, the lidar is spinning around, however if we know that our robot will be in one place for a while, we might want to pause scanning to conserve battery life.

The scanner driver provides a service called /stop_motor to perform this functionality, and since it doesn't require any information, the message will be of type std_srvs/srv/Empty (i.e. "empty service message").
Again, two useful commands for working with services are:
ros2 service list- To see a list of all services availableros2 service call <service_name> <service_message>- To manually call a service ith the command .
In the example below, we can see the start/stop motor services provided by rplidar_node, and the result of a call to the stop motor service. The driver node receives the call, stops the motor from spinning, and returns another Empty message, since there is no information to provide back to the caller.

For more about services, see this page.
5. Node Arguments (Parameters and Remapping)
Two powerful features that ROS gives us when working with nodes are parameters and remapping.
Parameters are options to change the behaviour of a node. For example, if we had two lidars connected at once, we would need two driver nodes and each one would need to know which serial port it should communicate on. The programmer who wrote the node can specify whatever parameters they want the users to be able to set.
Remapping lets us change the names of the topics that a node publishes and subscribes to (as well as some other things with names, like services). This is most useful when you have two nodes that need to communicate with each other, but expect the topic to have a different name. For example a driver might publish to /scan, but a node processing the data might expect /laser_scan.
Another reason to remap is to avoid conflicts. If we are trying to connect to two lidars at once, we might want to use remapping to tell one driver to publish on /scan_1, and the other on /scan_2.
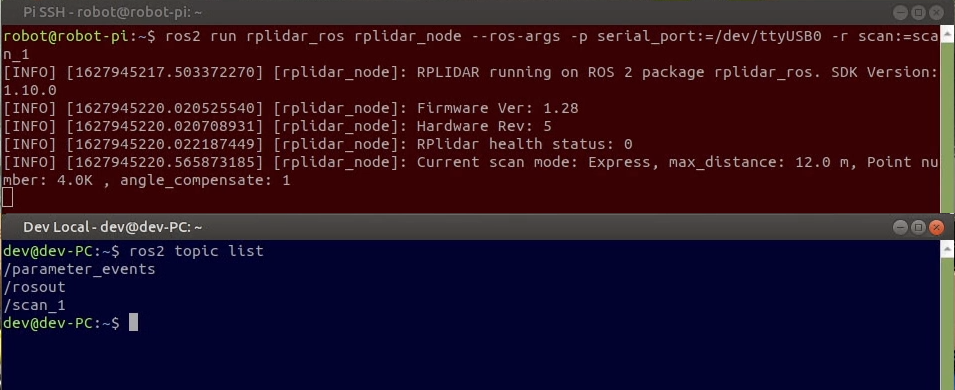
To enable these features we need to add --ros-args, and then -p for parameters or -r for remapping. For example, the first lidar in the above example might be run with:
ros2 run rplidar_ros rplidar_node --ros-args -p serial_port:=/dev/ttyUSB0 -r scan:=scan_1
Now, if we check the topic list again, we can see that the node is publishing on scan_1.
When trying to avoid name conflicts, remapping individual topics and services is not usually the best method, since there may be many. Instead, ROS gives us the ability to put a whole node into a namespace. This saves us from having to remap every name, and keeps things neatly separated.
To set a namespace we use -r again, but this time with a special argument, __ns:=/my/name/space.
For example, if we run our second laser driver with:
ros2 run rplidar_ros rplidar_node --ros-args -p serial_port:=/dev/ttyUSB1 -r __ns:=/scanner2

Then we check the topic list again, we can see the result.
There are a few other things we can do with parameters and remapping, to see some of them take a look at this link. For some more (slightly older) resources on name remapping from the ROS docs see here and here.
6. Launch Files
When we're working on a ROS project we will often be running the same nodes over and over again with the same parameters and remappings. This becomes pretty tedious as you need to remember to open all the terminals and get all the parameters right, then stop them all when you're done.
To help with this, ROS provides a scripting system called "launching" that lets us configure and launch a bunch of nodes together in a group. In ROS 1 the launch system was based on XML files, and although ROS 2 does technically support the XML format, currently the more popular and powerful approach is a Python-based system.
Unfortunately, the syntax of the Python scripts can also be pretty confusing to wrap your head around.
An example of a launch file to run the nodes we have already been using in this tutorial is shown below. Note especially the parameters, remappings, and namespace specified.
from launch import LaunchDescription
from launch_ros.actions import Node

def generate_launch_description():
    return LaunchDescription([
        Node(
            package='rplidar_ros',
            executable='rplidar_node',
            parameters=[{
                'serial_port': '/dev/ttyUSB0'
            }],
            remappings=[
                ('/scan', '/scan_1')
            ]
        ),
        Node(
            package='rplidar_ros',
            executable='rplidar_node',
            namespace='/scanner2',
            parameters=[{
                'serial_port': '/dev/ttyUSB1'
            }]
        )
    ])
Two ways to run a launch file are:
ros2 launch <package_name> <launch_file_name>- To run a launch file from a packageros2 launch /path/to/launch/file- To run a launch file directly (useful for a quick test, but putting into a package is better long-term)
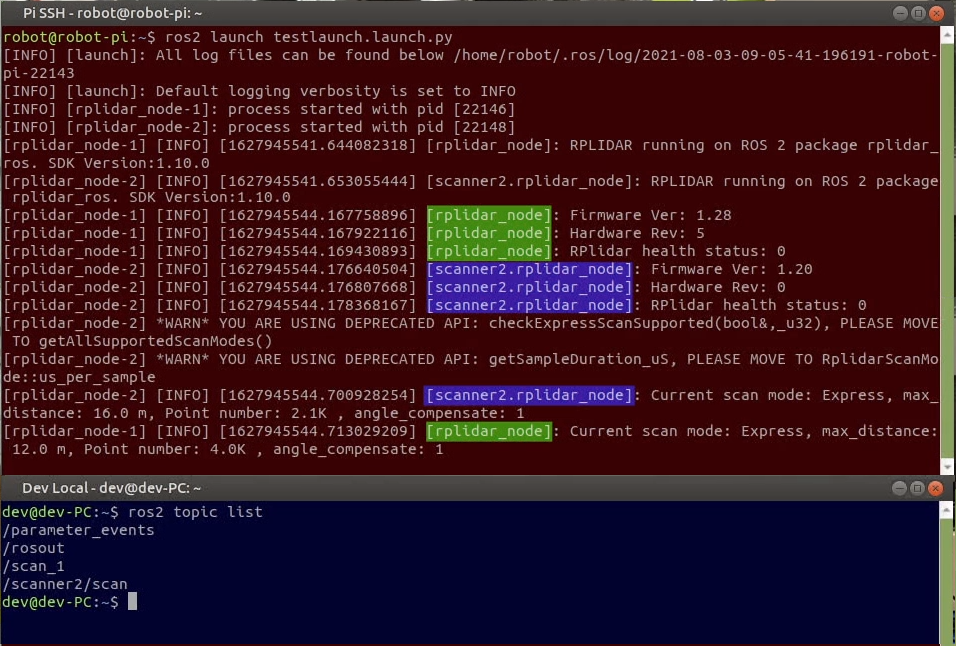
In the screenshot below, we can see the result of running this example launch file. Both driver nodes are executed in the same terminal, and their output is interleaved with labels to identify which node is printing which lines. In the other terminal, we can see the two nodes publishing to their topics.
Take a look here for the official tutorial on creating launch files.
7. Packages
Ok, so we know that a ROS system is made up of all these nodes and parameters and launch files and so on, but how are these organised?
The first level of organisation is called a package. A package is a way that we can group a bunch of closely related files together, and especially (but not always) so that we can reuse common code in different projects. A package can contain a variety of things, such as a single node, a set of nodes and configuration files, models for a robot, software libraries, or anything else you want!

In addition to its own files, each package includes a list of which other packages it depends on, things it needs in order to work.
For example, we might have a scanner_driver package that contains a node for communicating with the laser, and a launch file that runs the node with some common parameters. This package would have very few dependencies - apart from the core ROS stuff it only needs to know about LaserScan messages so that it can create them. This scanner_driver package could then be used in many different projects.
We might also have another package called dual_scanner_robot which depends on scanner_driver and contains only a launch file to run two scanner drivers, mapping them to two separate topics.

But where do these packages come from, and how do they find each other?
8. System Install (the underlay)
Normally when we install software on a computer (using something like apt) all the relevant files go to special locations on the computer where they are expected to be found. For example, when you type a command at the terminal, it has a list of paths to check in order to see if it can find a program with that name to run.
Now ROS could use this approach if it wanted to, but there are some people who want to have multiple different versions of ROS installed and swap between them, which would cause conflicts. There are a few different tools out there to solve similar problems, like virtual machines, containers (e.g. Docker), or virtual environments (e.g. venv or conda), however ROS provides its own solution.
When you install a ROS distribution, it will create a directory in /opt/ros which contains all of the packages and config files that are part of that distribution (e.g. /opt/ros/foxy). Any extra packages you install (e.g. using rosdep or apt install ros-xxxx) will end up in this directory.
Additionally, a file is created in this directory called setup.bash. This contains all the information the system needs to temporarily add the ROS directory to the list of expected system locations. So when you first open a terminal it will know nothing about ROS, until you "source" your installation (e.g. by running source /opt/ros/foxy/setup.bash). We usually add this line to the bottom of our ~/.bashrc file, which is executed each time a terminal first opens, to ensure that our ROS installation is always "visible".
Note, when "sourcing", you can replace the word
sourcewith., e.g.. /opt/ros/foxy/setup.bash. Some online documentation will use this style, however I prefer to use the full word so that it is clearer.
We sometimes call this base ROS installation the underlay, because we will build our own ROS packages over it (more on this in a minute!). Technically you can have other underlays too, but for simplicity we can usually assume that the term underlay is referring to the main ROS installation.
That covers ROS packages that are installed to the system, but what about our own ones?
9. Workspaces/Overlays
When we work on ROS projects we create something called a workspace to keep all our own packages in. You can manage this however you want, but it generally makes sense for each project to have its own workspace, which will contain whatever packages are relevant to that project. Note that here we're talking about packages to be compiled from source (either written ourselves or pulled from somewhere like GitHub), the system-installed packages will be visible to all our workspaces.
If we were to build our code using normal tools, they wouldn't necessarily know where to find all the ROS components, and more importantly ROS wouldn't know where to find OUR packages. This is where the build tool colcon comes in.
When we use colcon to build our workspace, it will take all our source files from a src directory, build them into a build directory, and "install" them into an install directory. This isn't too different from other build tools, however it also creates a setup.bash file with all the information the system needs to how to find our packages, just like we had for the system installation. So every time we open a terminal to run code from that project, we need to source that workspace by running source path/to/workspace/setup.bash.

We sometimes call this the overlay, because it goes over the underlay. With the overlay sourced, ROS will first look for packages in the our workspace (the overlay), before looking at the system installation (the underlay). This way we can test against modified/updated versions of base packages without having to uninstall them. We don't usually want to automatically source this using our ~/.bashrc file, since we want to keep each workspace separate.
There's nothing stopping you from stacking overlays on top of each other, with each treating the previous as an underlay, but you'd only need that for complex projects.
Note: If you only have one or two workspaces, you might like to add an alias to your bashrc to save time. For example, if you add
alias s='source ~/dev_ws/install/setup.bash'then you only need to typesinto your terminal to source it each time.
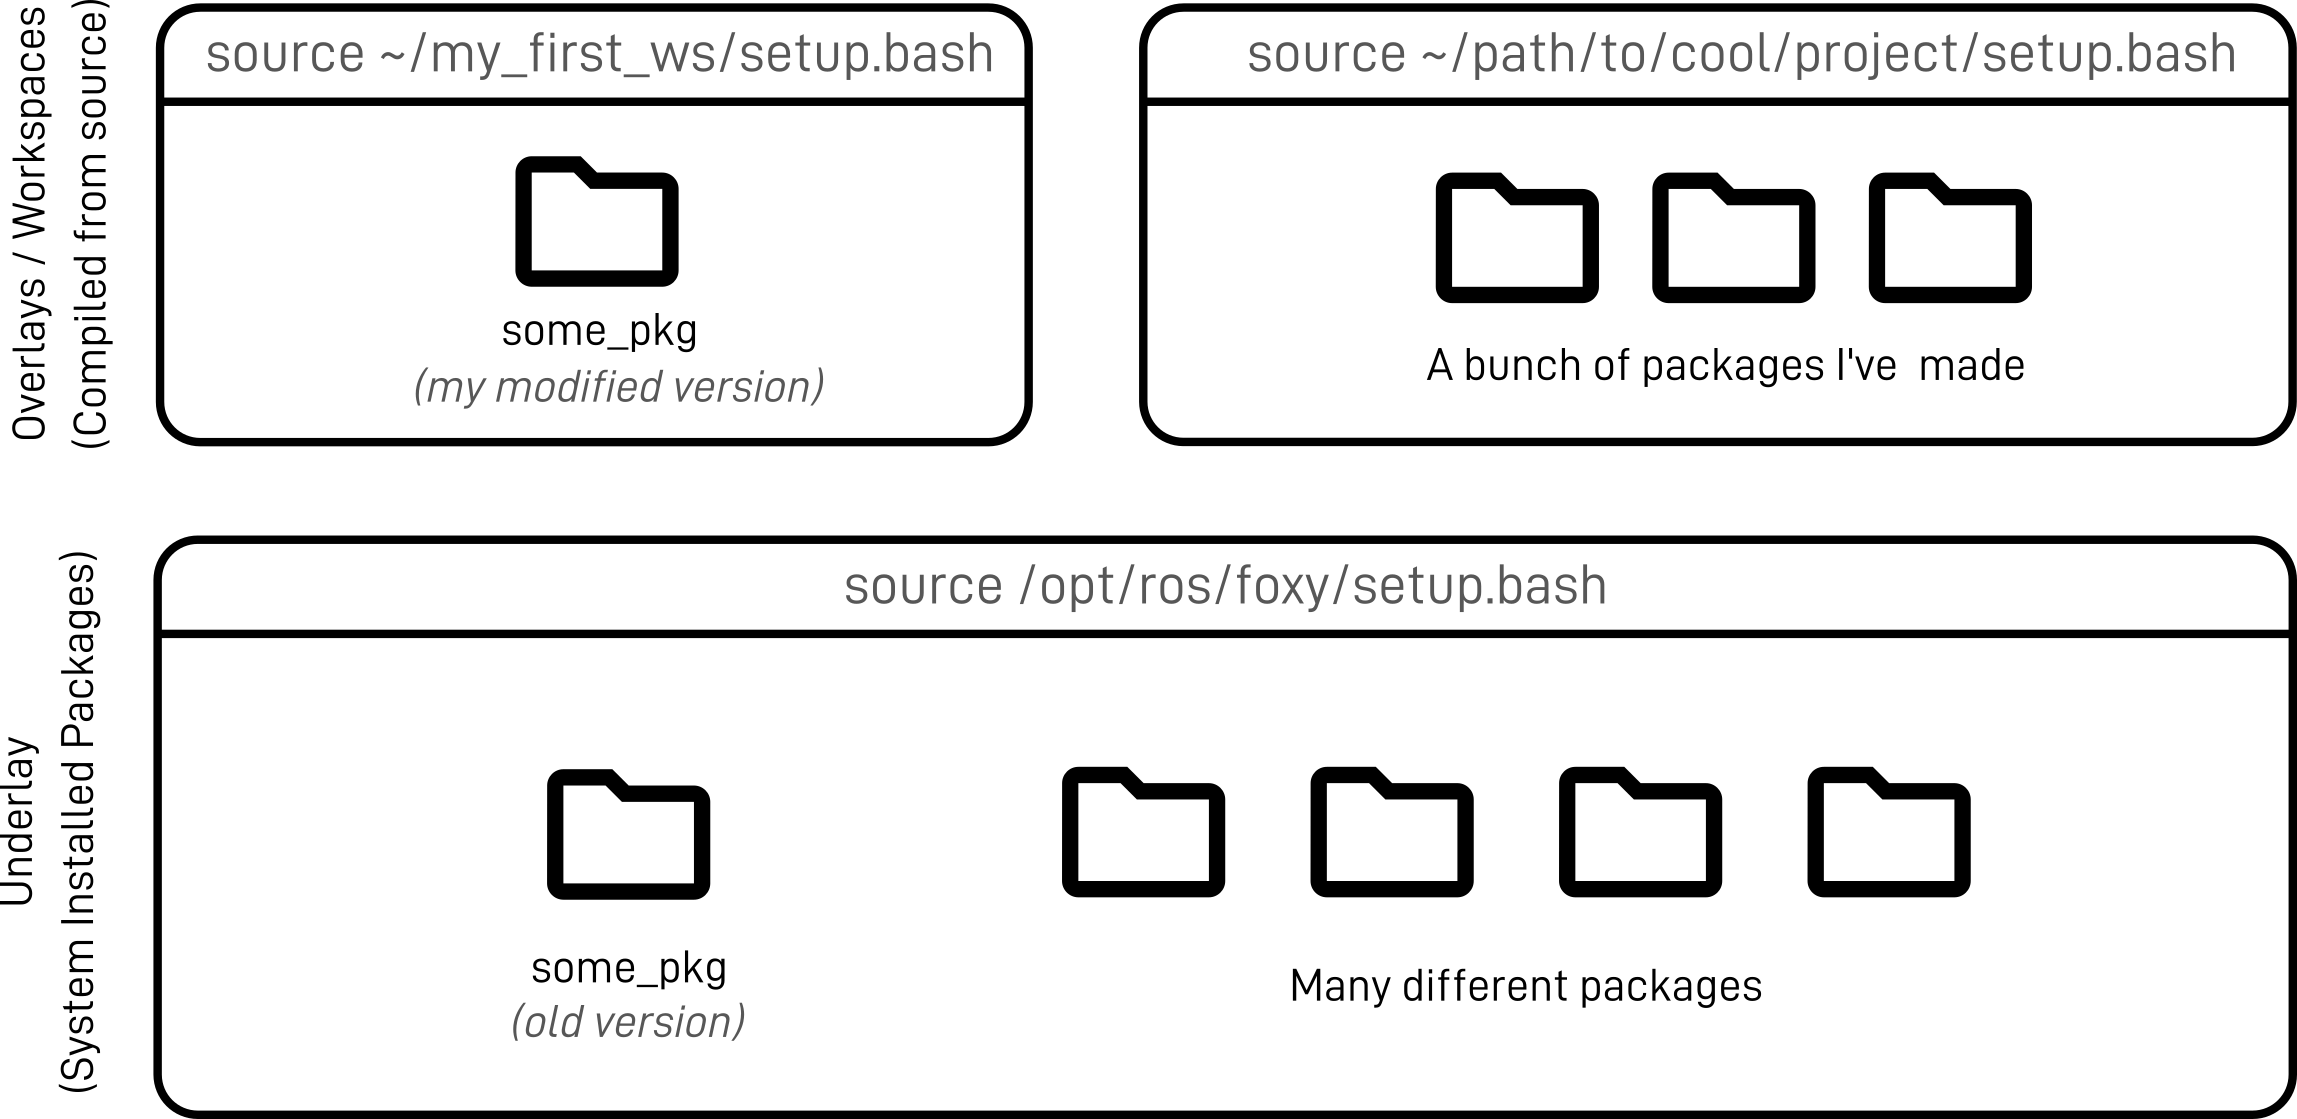
When we build using colcon, it doesn't matter whether our packages are written in C++ or Python, and if the dependencies are simple or complex, it just figures everything out for us. This whole process may seem a bit complicated at first, but it is easy to get used to, and once we have projects with more than a couple of packages it makes things much simpler.
10. QoS
The last item on this list is QoS, and the reason it's included is because it can be a real source of headaches for a beginner.
QoS (Quality of Service) is a new feature in ROS 2 which allows publishers and subscribers to set some standards or rules governing the transfer of messages on a topic. As an example, for one application it may be important that every single message is received by a subscriber and none are missed, even if that results in some delays, however another application may only be interested in receiving messages as fast as possible, and if that involves missing messages in order to get the latest one, that is ok.
However, if a publisher and subscriber do not have a compatible set of QoS parameters, then the messages simply won't get through. It's not always clear when using a node (that you didn't write yourself) what QoS settings it has, and you may not understand why your nodes can't communicate.
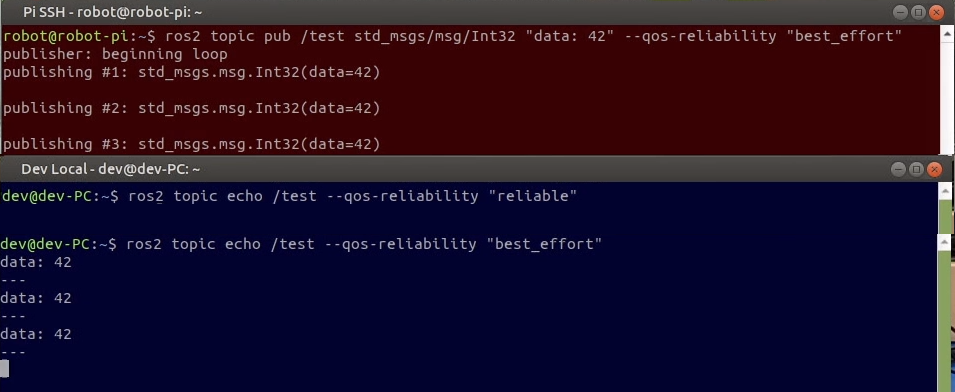
In the example below, the Pi is using a command ros2 topic pub to manually publish a message (the number 42) over and over, with the QoS reliability set to "Best effort". On the dev machine, ros2 topic echo is attempting to subscribe to the topic, with an expected reliability of "Reliable", and it fails to receive any messages. Once the subscriber is changed to "best effort", the messages are successfully received. The only hint we can get as to why it isn't working is by running ros2 topic info /topic_name --verbose, which indicates that the publisher is using "best effort", however we often don't even know what the subscriber is set to.
QoS can be a pretty confusing concept, so take a look here for a more detailed overview.
References
- ROS and the “nine dots” ROS logo are trademarks of Open Robotics