Simulating with Gazebo
What is Gazebo?
Having a good simulation environment is a valuable tool in robotics, as testing on real hardware can often be expensive and time consuming. The actions of some robots can be hazardous, and deploying code (especially in early development) carries risks. Working with real hardware can also introduce issues that impede core algorithm development. For this reason, time spent building an accurate simulation environment is usually well worth it.
Gazebo is a free, open-source robot simulation environment. The project is run by Open Robotics, the same group looking after ROS, however the projects are managed separately and Gazebo is not a "part of" ROS. This distinction can sometimes be a little confusing, and although Gazebo and ROS do integrate very well, they approach some things a bit differently.
Gazebo has recently (at time of writing) been rewritten and replaced by a new simulator called Ignition Gazebo (sometimes referred to as just Ignition). This is similar to the change from ROS 1 to ROS 2, but ROS 2 is still compatible with the old Gazebo (version 11). Unfortunately, key plugins are still not ready for Ignition, so these tutorials will keep using Gazebo for now.
With Gazebo, we can create a virtual "world", and load simulated versions of our robots into it. Simulated sensors can detect the environment, and publish the data to the same ROS topics that real sensors would, allowing easy testing of algorithms. Then, forces can be applied to the simulated actuators on the robot, taking into account things like friction.
Gazebo Installation and Overview
With ROS already installed, the easiest way to install Gazebo with the correct dependencies and plugins to get it working with ROS is with the following command:
sudo apt install ros-foxy-gazebo-ros-pkgs
Now that we have Gazebo installed, we'll start by exploring some aspects of Gazebo without ROS. We can start it by running gazebo at the command line, and we can also supply the path to a world file as the first argument. Run the command below to launch Gazebo with the "seesaw" world (which came bundled when we installed Gazebo).
gazebo /usr/share/gazebo-11/worlds/seesaw.world
Note, Gazebo can sometimes take a while to start (especially the first time) if it wants to download some stuff in the background.
Once Gazebo starts up we'll see the following screen. Take a minute to familiarise yourself with the interface (for the 3D view, left-click to pan, middle-click to orbit, right-click or scroll to zoom).

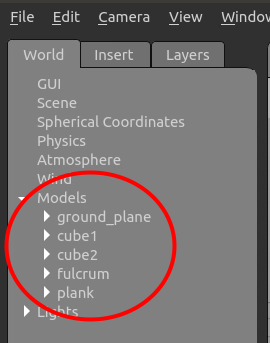
The simulated environment inside Gazebo is called the world, and this world consists of a bunch of models. If we open the "Models" drop-down in the top-left, we can see that the see-saw world contains 5 models: the ground plane, fulcrum, plank, and two cubes (it also has one Light called "sun"). Let's explore how these models interact in the physics engine.
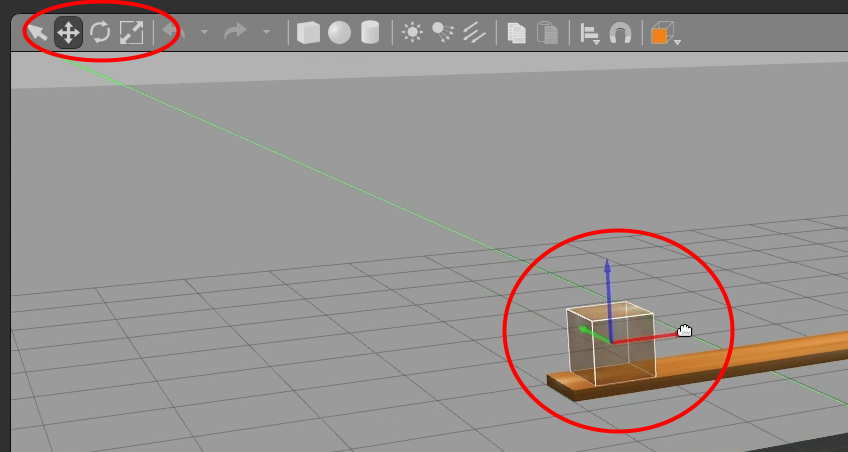
By selecting "Translation Mode" (pair of crossed arrows, top toolbar), we can left-click models to display an axis marker, then click and drag an axis to slide it.
Have a play around and see what you can make the seesaw do. "Reset World" (Ctrl-R, or Edit→Reset World) is helpful to clear what you've done (however certain changes will persist across resets - for these you'll need to restart Gazebo).
Some things to try:
- Moving the blocks while keeping the seesaw balanced
- Pausing the simulation (bottom toolbar), moving the blocks to mid-air, then playing
- Rotating the blocks (Rotation mode, top toolbar)
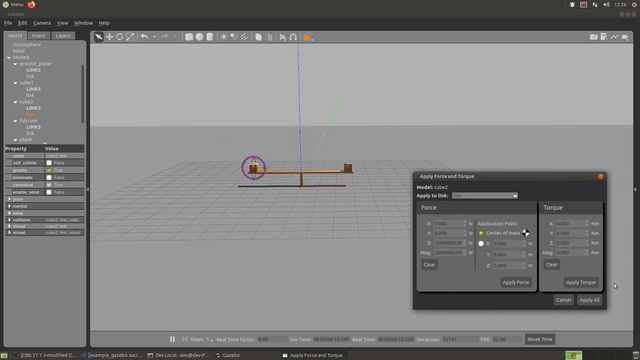
- Applying a force (right-click on a block while in selection mode, "Apply Force/Torque")
Applying -2,000,000N in Z on one of the blocks should produce a rather satisfying catapult!
Gazebo and ROS
Before we try to run Gazebo with ROS integration, let's take a minute to understand how the different pieces fit together.
Fitting Gazebo into our structure
In the previous tutorials we were generating joint state values using joint_state_publisher_gui, which were read (along with a URDF) by robot_state_publisher, which broadcasted the transforms and echoed a copy of the URDF to the robot_description topic. We used RViz to visualise all this.
As we introduce Gazebo, we want it to represent the "real world", a physical robot that we would interact with in various ways. For example, it would have the capacity move based on some control input, read data from sensors, and provide state feedback from the actuators. The diagram below shows this new structure - for now we can treat Gazebo as a big "blob", and the details (plugins, spawner, etc.) will become clearer soon.

URDF/SDF/World Files
In the last tutorial we learnt how to create a URDF file for our robot, and integrate it as shown in the diagram above. Gazebo, however, does not use URDF files natively, instead it uses a different (but similar) format called SDF. While URDF only describes a robot, SDF can describe a robot, or the world, or any model in the world.
The good news is that we don't have to double-up and write both an SDF and URDF file for our robot, just for the sake of simulation. Gazebo has the ability to automatically convert a URDF to SDF for us (we can use the command gz sdf -p to experiment with this). Although this conversion is automatic, the resulting file still usually won't have everything Gazebo requires to run properly. Through the rest of this tutorial we'll cover a few things we need to add or check in our URDF file to make sure it will work correctly with Gazebo, and you can also check out the official tutorial here.
Apart from our robot, SDF files are still useful. We can use them to define models (any object that can be spawned, whether it's a cube, a car, a house, or our robot), or worlds (an environment that contains a collection of models). This is great because we can mix-and-match our robot with a variety of models and environments for testing.
Gazebo Tags
To add extra information to our URDF that is Gazebo-specific, we can add gazebo tags. Gazebo will use the content of these tags to generate its SDF files, but other things reading the URDF can just ignore them. These gazebo tags can reference a component of the URDF by name (i.e. a robot, link, or joint) using the syntax <gazebo reference="some_name">, or for things that are not linked to a component, but are relevant to the whole file we just use <gazebo>.
Plugins
Any time Gazebo needs to interact with ROS (or any other external software for that matter), it needs to use plugins. These are extra code libraries that we can install, and then reference in our URDF, which Gazebo will execute as it needs to. Want to control your Gazebo robot using ROS topics? Use a plugin. Want the Gazebo joint states to be published to a topic? A plugin. Want to access the data from a simulated sensor? Plugin. There are plenty of examples of these plugins in action in the example code at the end.
Sim Time
One trick to be aware of is that ROS treats time a little differently when simulating, and all nodes will need the /use_sim_time parameter set to true. You might notice some nodes (e.g. robot_state_publisher) will seem to work without it, but even then it is best to set it as there can be subtle differences in behaviour. Here is an explanation of the concept (ROS 1, but the idea is the same), which is basically that Gazebo wants to "control time" so that we can run simulations faster or slower and ensure things are synchronised. Time in ROS is normally measured in "Unix time" (seconds since 1/1/1970), but while simulating it is measured in seconds since the start of the simulation.
In ROS 1 it was sufficient to set /use_sim_time globally but in ROS 2 we need to do it on a per-node basis. Using launch files can greatly assist in this as we can turn it on/off in one place (at launch) and have it pass the argument on to all the nodes appropriately.
Extra notes
There are a few other things that are good to remember as we work with Gazebo and prepare our URDF file for simulation:
- Names - We touched on this briefly in the last tutorial, but to keep things simple we just need to make sure every joint and link has a (unique) name, and Gazebo shouldn't have trouble with that.
- Merging links - Gazebo will take any URDF links that are connected by
fixedjoints and combine them into a single SDF link. This isn't a problem, but can sometimes be confusing. - Inertial properties - Gazebo requires that every link has an
inertialtag associated with it. Because it combines fixed-joined links, this means that we don't need every link in our URDF to have an inertial tag, just that in any group of fixed-joined links we need at least one to have an inertial tag (if multiple do, they will get merged by Gazebo). - World links - If our robot is fixed to the ground, the first link should be called
world, and Gazebo will know that regardless of the rest of the physics, it should keep that link fixed still. For a mobile robot our first link should NOT be called world (and why would it be?). - Materials/Colours - We'll look more closely at this below, but for technical reasons Gazebo is unable to use the materials specified in our URDF. Instead, we need to add a
gazebotag for the link and specify an appropriate material in there.
Running Gazebo with ROS
Launching Gazebo
Earlier, we ran Gazebo directly with the gazebo command, however this is running Gazebo separated from ROS. Running it with ROS support can be trickier, so we are provided with a ROS launch file that takes care of things for us. The command below will launch Gazebo, loading up a particular world environment (more on this in a moment) if we choose to specify it.
ros2 launch gazebo_ros gazebo.launch.py world:=src/robot_testing/worlds/world6.world
Spawning our robot
Once we have fixed up our URDF file, we want to run robot_state_publisher to publish it to the robot_description topic (as we've seen in the last few tutorials). Once this is up, we can run the command below which will spawn the robot into the gazebo
ros2 run gazebo_ros spawn_entity.py -topic robot_description -entity some_name
This will spawn the robot described by the URDF on robot_description and give it the name some_name within Gazebo. We can also spawn robots directly from files or model databases, but in most scenarios we will have a description topic running already so we use that.
Using our own launch file
To simplify the process of all this, we can wrap it up in a launch file (as usual). The launch file below will run robot_state_publisher (with use_sim_time set), the Gazebo launcher, and the spawner script.
Integrating a robot into Gazebo
We'll now take a look at some of the steps that could be taken in converting a robot (such as the one from the previous tutorial) to work with Gazebo.
For reference, the full code is shown here, the paragraphs below are to provide some further explanation:
Materials/Colour
Even if we specify the colours for RViz in our URDF using the material tag, these won't show up correctly in Gazebo. Instead, we need to use a gazebo tag for each link, with its own material tag, specifying an appropriate material (Gazebo comes with a bunch, you can click here and search for Gazebo/ to see what they are).
<gazebo reference="my_link">
  <material>Gazebo/Black</material>
</gazebo>
Publishing joint states and running controllers
Once the robot is spawned inside Gazebo, there are two key things the simulator needs to do to integrate with the broader ROS system:
- Simulate virtual actuators based on some kind of command input
- Publish the resulting joint positions/angles to the
joint_statestopic
Then, robot_state_publisher will have the information it needs to broadcast all the transforms.
As we saw earlier, the way to achieve this is through a plugin. The most common and powerful plugin for these tasks is gazebo_ros2_control. It is designed as part of a broader system called ros2_control, which is a modular system that allows for easy reuse of controllers between the simulated and real version of a robot, or even between different robots.
Although gazebo_ros2_control is a great plugin which can do both of those tasks, it can be confusing for beginners and will require a whole tutorial of its own. There are other plugins out there that achieve these tasks in different ways, and the ones used in the demonstration video are simpler ones that come bundled with the gazebo-ros libraries.
Note, in ROS 1 a big part of how we interact with Gazebo and
ros_controlis through a concept calledtransmissions. As far as I can tell, although there is some support for these in ROS 2, they don't seem to be the standard approach right now.
An example of the plugin used in the video to publish joint states from Gazebo:
<plugin name="gazebo_ros_joint_state_publisher"
          filename="libgazebo_ros_joint_state_publisher.so">
    <update_rate>20</update_rate>
    <joint_name>slider_joint</joint_name>
    <joint_name>arm_joint</joint_name>
</plugin>
And for joint control:
<gazebo>
    <plugin name="gazebo_ros_joint_pose_trajectory"
        filename="libgazebo_ros_joint_pose_trajectory.so">
        <update_rate>20</update_rate>
    </plugin>
</gazebo>
After restarting Gazebo we should see the robot represented correctly in tools like RViz as the transforms are now working. Running the command below will set the joints to the values at the end (so 0.8m for slider_joint and 0.6rad for arm_joint).
ros2 topic pub -1 /set_joint_trajectory trajectory_msgs/msg/JointTrajectory '{header: {frame_id: world}, joint_names: [slider_joint, arm_joint], points: [ {positions: {0.8,0.6}} ]}'
If the robot is "flopping" around too much, try adding some damping to the joints in the original URDF (slider_joint and arm_joint) with this tag:
<dynamics damping="10.0" friction="10.0"/>
Sensors
Gazebo has the ability to simulate sensors and publish their outputs to ROS topics. Each sensor must be attached to a link, so we need to add a <sensor> tag inside the Gazebo reference tag we want to add it to. The exact implementation will be different for every sensor so we won't go into them all now, but for each one we need to specify the sensor type, the plugin required to connect it to ROS, and any parameters the sensor or the plugin require.
Here's an example of a sensor tag that we might use to simulate a lidar (called a "ray sensor" in Gazebo), the sample code earlier demonstrates a full config for a depth camera.
<gazebo reference="lidar_link">
    <sensor name="lidar" type="ray">
        ...any parameters common to all sensor types...
        <ray>
            ...any parameters specific to the ray sensor...
        </ray>
        <plugin name="laser_controller" filename="libgazebo_ros_ray_sensor.so">
            ...any parameters specific to the ROS ray sensor plugin...
        </plugin>
    </sensor>
</gazebo>
We'll tackle different sensor types in future projects, but if you want more info, check out:
- Gazebo tutorial on ROS plugins (ROS 1 oriented)
- GitHub wiki for the plugins (including ROS 2 migration)
Better Worlds
When we first launch gazebo the world is pretty boring - just a big flat plane. Thankfully there are some things we can do to make it a bit more interesting, here is just a start.
Adding objects
We can click the "Insert" tab in the top-left corner to add new models. This will find models that we have stored locally (in certain locations) as well as models from an online database. Each time we start up Gazebo it reloads these databases which can take a long time - so we just need to be patient. Adding a model for the first time can be slow as it pulls it from online. Once we've added a model it should be saved to our local collection (at the top of the list) where we can add it quickly, but this doesn't always work correctly.
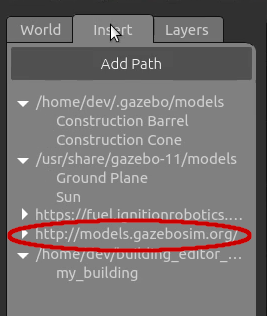
In my experience the models from gazebosim.org are more reliable when using Gazebo Classic.
Using the Building/Model editors
Under the edit menu we find the Building Editor and Model Editor. It's a little confusing - these both let us create models - but they do it in different ways.
The model editor lets us combine primitive shapes and existing models together to create new models. The building editor lets us draw a floor plan to generate walls, which we can add colour and texture to, and save the resulting set of walls as its own model.
With both of these tools we need to save our new model before we exit, and the resulting model will be added to our scene and also saved to be reused in future worlds.
Using the built-in worlds
There are some built-in worlds in /usr/share/gazebo-11/worlds (such as the seesaw demo from earlier) however many of these are designed to demonstrate particular features or plugins, rather than being a general environment (cafe.world is an example of a good one).
Using models and worlds others have made
Gazebo has been around for a while and there are many models and worlds out there that others have made for us to use. It's worth taking a look around for what is out there (although be aware that you may occasionally run into compatibility issues with different versions). Some of these can be conveniently installed using apt, others we need to just download the files ourselves.
Some possible sources for worlds (not all tested) are:
- AWS Robotics Github
- Turtlebot worlds (install
ros-foxy-turtlebot3-gazeboand look under/opt/ros/foxy/share/turtlebot3_gazebo/worlds/turtlebot3_worlds/) - Clearpath Robotics here and here (these may be dependent on other packages)
Under the Hood & Dealing with crashes
Before we wrap up, there are a couple of other things that are good to be aware of. As great as Gazebo is, it isn't always the most stable software, especially with the ROS plugins, and before too long you'll probably find yourself stuck and confused by something.
Server & Client
Gazebo is actually made up of two different programs, gzserver and gzclient. The server is actually the main part and handles running the simulation with all the physics etc. The client is the graphical interface, just a way for us to interact with the simulation that is occuring.
This means it's possible to run a simulation on a computer without a display, or to have the server on one computer with the client on another, but as this is usually for more advanced users, the gazebo command (and launch files) are provided to cover the common case of running them together.
Terminal stuck after closing
After we close Gazebo we might not be able to type in our terminal anymore. This is (sometimes) because part of it has been shutdown but the launch file is still running. We need to Ctrl-C in the Gazebo terminal window to interrupt the process and stop it.
Can't run Gazebo again after closing
If the above doesn't work, or if it does work but Gazebo freezes on the next launch, there is probably a part that hasn't stopped properly.
Usually the below command will take care of things (best to try without sudo or -9 first).
sudo killall -9 gazebo gzserver gzclient
Commands such as ps and pstree can help to track down processes.
Running multiple copies
If for some reason we want to run multiple copies of Gazebo we need to be careful as they will "see" each other and interact - just like if we were trying to run multiple ROS sessions. Here is an example of how to do this. Disclaimer, I've never tried this and don't know if it works.
Stuck on launch screen
There are a few reasons that Gazebo can get stuck on the launch screen. A few of them are:
- It's downloading models in the background. Wait for a few minutes, ensure your internet connection is good.
- There are old processes preventing the new one from starting. As mentioned above, kill the old processes.
- There is a problem initialising the 3D graphics. Check your graphics driver is set up properly.
- Some other issue - check the terminal window to see if there is an error message.
Up Next
Now that we know how to simulate our robots in Gazebo, we're ready to start building them in real life! This is the end of this tutorial series (for now, at least), keep an eye out for the next series on building a mobile robot with ROS.