Packages
In the last few tutorials we've set up a ROS development environment and taken a quick overview of ROS and how the parts fit together. In this post we're going to start developing our own code, and learn how to create a workspace with a very simple package inside it. For more documentation on creating packages, see the official ROS tutorial.
In this tutorial we'll cover:
Creating a workspace
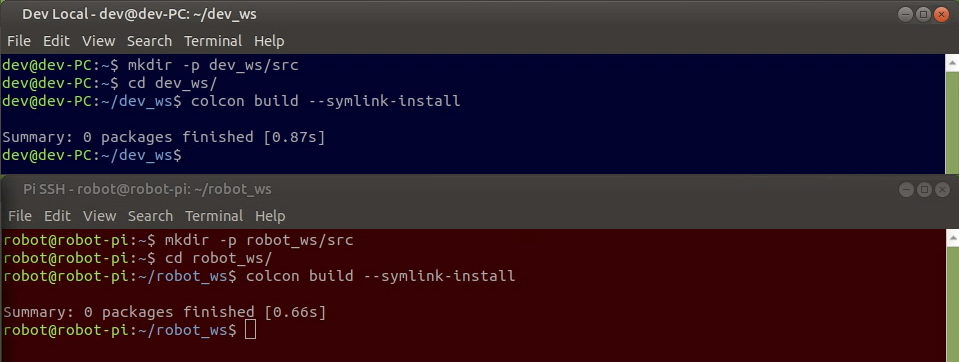
Once we've installed ROS and set up our environment on both computers, we need to create a workspace on each one (if you don't know what a workspace is, check out the previous post). We can put it anywhere, and name it anything, but the common approach you see online is to call it dev_ws and put it in your home directory. For these tutorials, we'll name the one on the base station dev_ws and the one on the Pi robot_ws.
To create our workspace, execute the following commands on both machines (replacing dev_ws with robot_ws on the Pi).
mkdir -p ~/dev_ws/src
cd ~/dev_ws
colcon build --symlink-install
These three steps:
- Create a workspace folder, and a folder for our source code (packages) inside that
- Change to the workspace directory
- Attempt to build our (empty) workspace, using the "symlink install" option. (This option uses symlinks instead of copies, so you don't need to rebuild when tweaking certain files. It's generally good to use this mode unless you have a reason not to.)
At the moment our workspace is empty, which is a bit boring. We need to write a package to go in it!
Creating a package
In ROS, a package is a way to group together a bunch of related files, e.g. executables, config files, launch scripts (see the previous post for more on this). Even a basic robot which doesn't require any "real" custom code to be written will still have a bunch of files to tell ROS what to do. To do this we'll create our own package that would contain all of the stuff specific to our "robot". We'll push this to a remote GitHub repo, which doesn't need to be shared publicly (although you can!), it just provides a convenient way to access and synchronise our work between the dev PC and the Pi.
Create an empty package
We want to cd into the src directory and run the following command. This will create an empty ROS package called my_package (you can call it whatever you want), that uses CMake to build (the alternative being Python).
ros2 pkg create --build-type ament_cmake my_package
Look at the structure it has created. Note that if we were writing C++ code we would put the files inside include and src. Since we aren't we can delete them if we want, or we can leave them.
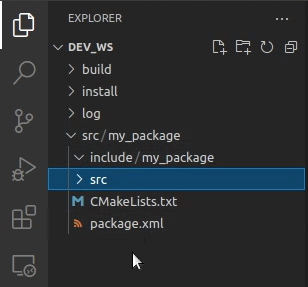
Note, if you aren't familiar with VS Code's explorer structure, the above screenshot may be a bit confusing. Where it says
src/my_package, that means thatmy_packageis the only thing insidesrc, and so the dropdown is showing the contents ofmy_packageinstead. The directoryinclude/my_packageis the same, however this directory is empty, so thesrcon the line below that is next toinclude, not inside it.
Add our files
This is going to be just about the simplest package we can make. We're not even going to have any nodes in it, all it will have is two launch files, one to run the demo talker and one to run the demo listener (we ran these back when we first tested our ROS installation). Obviously this isn't a very practical use of the launch system as the demo nodes are simple to run by themselves, it's just to provide an easy example.
Using whatever method we like (I'll be using VS Code), we want to create a directory called launch inside our package's root folder (next to the package's src folder, not the workspace one). Inside that we want to create two files, talker.launch.py and listener.launch.py.

Now we can fill the files with the following content:
talker.launch.py
from launch import LaunchDescription
from launch_ros.actions import Node

def generate_launch_description():
    return LaunchDescription([
        Node(
            package='demo_nodes_cpp',
            executable='talker'
        )
    ])
listener.launch.py
from launch import LaunchDescription
from launch_ros.actions import Node

def generate_launch_description():
    return LaunchDescription([
        Node(
            package='demo_nodes_py',
            executable='listener'
        )
    ])
Update the CMakeLists
Now we need to update our CMakeLists.txt file. This file tells colcon (and internally, CMake) everything it needs to build and install our package. Because our package is so simple, all we need to do is add an instruction to install our launch files (which are inside the launch directory) to a special location that ROS expects. Note that ${PROJECT_NAME} is a special variable that you can use in any CMakeLists.txt and it will automatically resolve to the actual package/project name.
To do this, we add the following lines near the end of CMakeLists.txt, just before ament_package():
install(DIRECTORY launch
  DESTINATION share/${PROJECT_NAME}
)
Update other package info
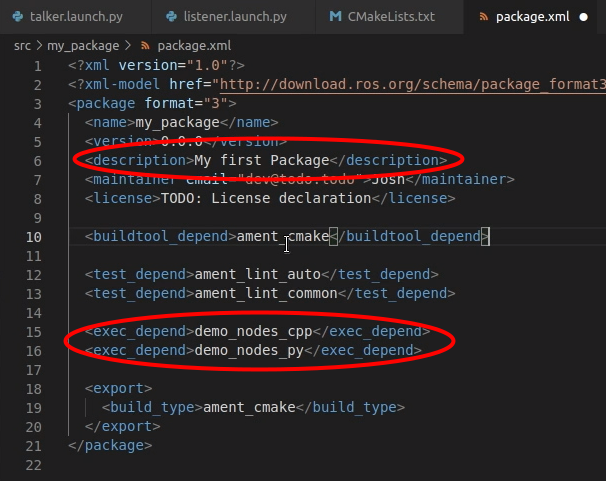
The file package.xml provides extra information for ROS and colcon to know about our package. One important part is the dependencies. These are other packages that our package relies on to build, execute, or both. For our example package, we are running nodes from demo_nodes_cpp and demo_nodes_py, so we rely on them for execution.
We need to add the following lines to package.xml, before the export section. Note that we used exec_depend, we could also use build_depend if we relied on them to build, or just depend for both.
<exec_depend>demo_nodes_cpp</exec_depend>
<exec_depend>demo_nodes_py</exec_depend>
While we're here, we can update some of the other information in package.xml such as our name, email, description, and license. Even if no one else ever sees this package, it's good practice.
Build the package
To check that our package builds, we need to change directory back to our workspace and run colcon build --symlink-install. If this runs without errors, we could have a go at sourcing our workspace and launching our files, but to make things interesting let's sync them to the Pi first.
Syncing our package between machines
It's always a good idea to keep code backed up and version controlled. Using Git with an online service such as GitHub lets us do that easily. (Note, using git is technically not a proper backup, but it's good enough for most scenarios). Git is also a useful tool for when we have multiple developers working on a project at once, or in our case, developing on multiple machines.
In these tutorials, we're going to use GitHub to synchronise our code between the Pi and the dev machine. If you haven't got a GitHub account, go ahead and make one now. We'll also be using SSH to authenticate, so if you haven't got that set up already, take a look here. If you already have an approach for managing this, feel free to skip this section.
Creating a repo
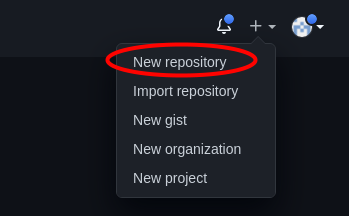
To start, we'll need to create a repo in GitHub by clicking the "plus" in the top-right corner.
This will bring up the following page where we can give the package a name (usually the same name we gave it in ROS), choose to make it public or private, and then we want to skip the "Initialize" options and hit "Create Repository".

Push the package to a repo
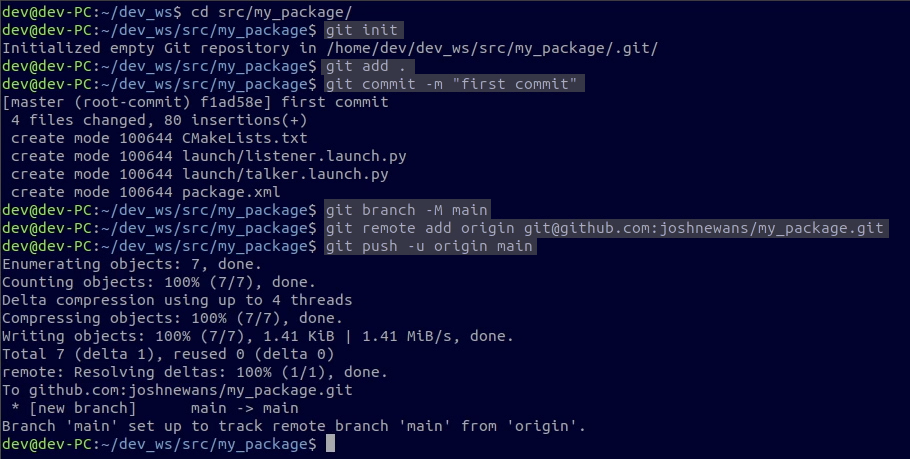
Now we need to push our local content to this repo. With a terminal in your project directory, we can run the following commands (from inside the my_package directory) with our username and repository name substituted. If you've never used Git on this computer before, you may also need to set a username and email address (it will tell you how).
git init
git add .
git commit -m "First Commit"
git branch -M main
git remote add origin git@github.com:<GITHUB_USERNAME>/<REPO_NAME>.git
git push -u origin main
These commands:
- Initialise git for the directory
- Stage the whole directory (ready to be committed)
- Create a commit with a message
- Create a
mainbranch - Set the URL for the cloud repo to push to, and give it the name
origin - Push the
mainbranch to theoriginrepo
The terminal will respond to let us know it has been pushed.
Note, it is not unusual to have multiple packages inside a single repo. This is fine, and colcon will still see packages that are nested inside directories, however you cannot have packages inside other packages.
Pull the package onto the Pi
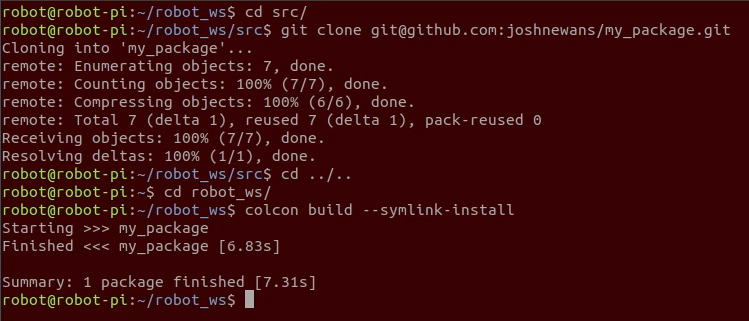
Now, on the Pi we want to cd into the src directory of our workspace and run the following command (remember to set up SSH authentication first!)
git clone git@github.com:<GITHUB_USERNAME>/<REPO_NAME>.git
We can now cd back to the root of our workspace and run colcon build --symlink-install.
Testing the package
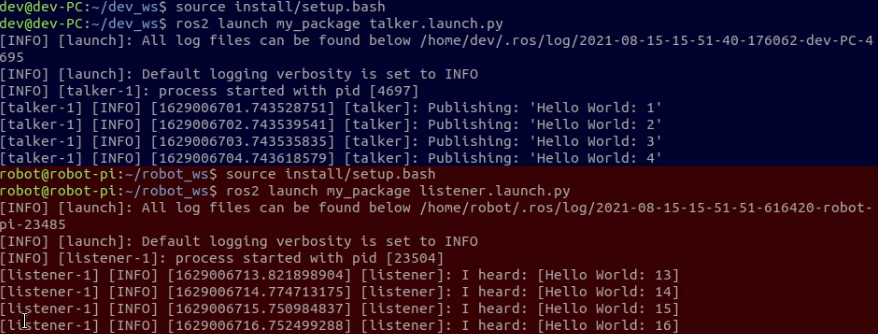
Now we're ready to test our package. First we need to "source" our workspace on both machines. If you're going to keep rebuilding with colcon it's best to open a separate terminal for building and running, but for now we can just use the one.
To source your workspace, we simply run source /path/to/workspace/install/setup.bash. Usualy, we just cd into the workspace directory, and run source install/setup.bash.
With the workspaces sourced, we can run the two following commands, one on each machine.
ros2 launch my_package talker.launch.py
ros2 launch my_package listener.launch.py
Up Next
Now we know how to create a workspace, create a package, build that workspace, push a package to GitHub, and pull a package from GitHub. In the next tutorial we'll learn about the ROS transform system, and how we can use RViz to visualise the structure of our robot.