What do you need?
So you want to build a robot with ROS?
If you're reading this, then you've probably at least heard of ROS, and you're interested in how you can use it to build your own robots.
For those who don't know, ROS is a series of software libraries and tools to simplify the development of robots. By sharing this common code, developers don't need to rewrite everything from scratch and can instead focus on developing their own new algorithms and technologies. These new designs are then compatible with all of the other ROS systems out there, helping the whole industry to grow and solve problems faster, together.
There are many different kinds of robots out there, so this series will cover some of the concepts and procedures that are pretty common no matter what kind of robot you want to build. In this post we'll start by looking at five things we'll need before we start installing ROS:
- The Right Skills
- The Right Computing Hardware
- The Right Operating System
- Other Useful Software
- Other Useful Tools
The Right Skills

These tutorials (and future ones) will assume you have the following skills. If you don't have all these, don't let that scare you off! Just give things a go, and if you get stuck there are plenty of resources online to help you.
- Computer administration (installing operating systems, networking)
- Familiarity with Linux and the terminal/command line (creating and navigating files and folders, installing software)
- Familiarity with Git (or another version control system)
- Basic understanding of programming and compiling (we won't need to do much actual programming, but at some point we will need to compile other people's code)
- Basic electronics experience (using Arduino, breadboards, soldering, etc.)
The Right Computing Hardware
Getting the computing hardware right can sometimes be a difficult aspect of robotics. It's generally not feasible to get a processor that is:
- Powerful (to run our algorithms)
- Small/low-energy (to not overload the structure and batteries of our small mobile robot)
- Cheap (because who doesn't like things to be cheap).

In addition to this, the development process often requires significantly more power. A few reasons we might need more computing power for development are:
- Running unoptimised prototype algorithms
- Running development tools (e.g. IDE, debugger, visualisation) at the same time as our algorithms
- Running a simulation environment at the same time as our algorithms
To achieve this in a fairly affordable manner, the setup we will use in these tutorials is to have two computers. The robot itself will have a small single-board-computer (a Raspberry Pi 4) onboard, and this will be paired with a larger, more standard computer (e.g. a mid-range laptop or desktop) offboard that will act as both a "base station" and as a development machine.
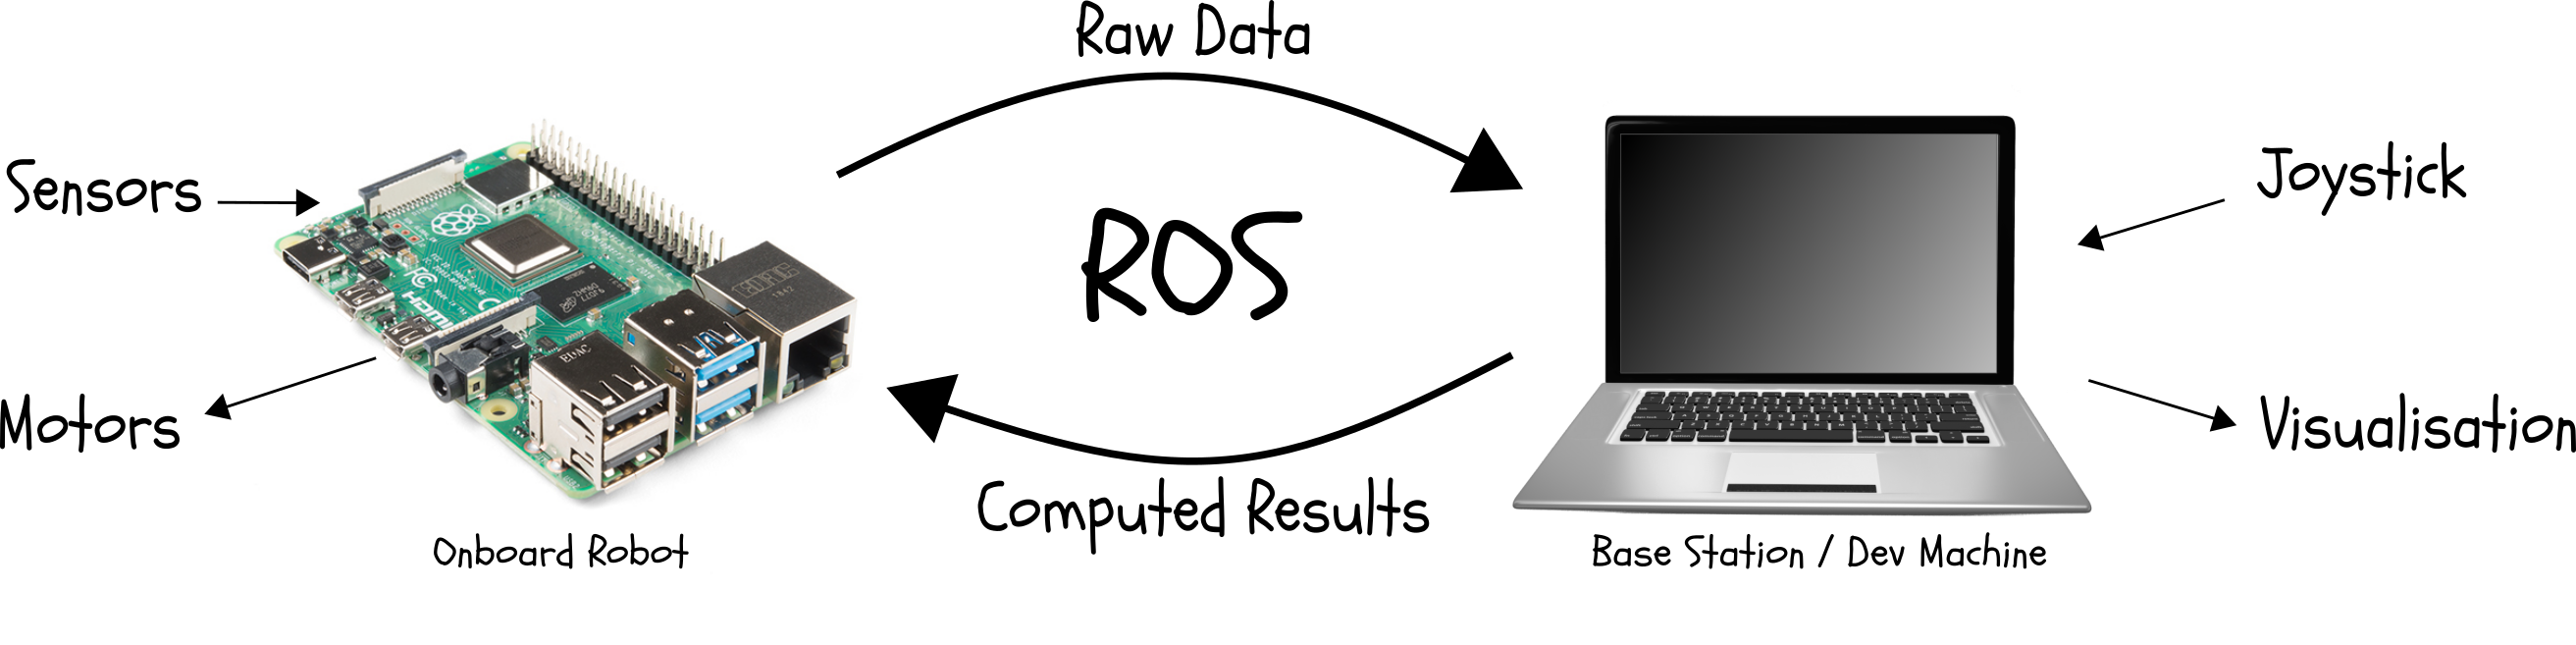
The Pi will process the raw sensor data into ROS compatible messages and transmit them over the network to the base station (also running ROS). The base station will use this data to compute the appropriate motions and send them back over the network to the Pi. The Pi will then convert these into signals to send to the motor driver to move the robot.
This "base station" PC will also be used as a development machine, to run simulations, visualise data, receive joystick input, and finally to write code on.
If you know what you're doing, you're welcome to tweak this setup (e.g. using an NVIDIA Jetson board, or splitting up the base station and development into separate PCs), however this setup has been chosen to be simple, effective, and affordable, and so we'll assume it for these tutorials.
Although we will eventually be running the Pi without a screen (in the robot), for the set up process we will assume that both the Pi and the dev machine have power, keyboard, mouse, monitor, and internet all connected.
Note 1: Although the base station/dev machine does not need to be a high-end gaming rig, having a reasonably powerful machine will be beneficial. For example, a laptop from the last few years with an i5 processor would be a fine choice. Lower-end machines will probably struggle to run the 3D simulations effectively, and some algorithms may require modified parameters.
Note 2: For my regular development, I use ROS inside Docker on a desktop machine. Docker containers and Virtual Machines can be very useful tools for developing with ROS, but they can also add an extra layer of complexity. If you are comfortable with setting these up, feel free to go ahead and try it, but be prepared to deal with any hiccups along the way. Edit: Since writing this I've also added this guide which includes more details on setting up ROS in a Virtual Machine.
Note 3: Part of this series will be introducing the robot simulation software Gazebo. Using Gazebo we can develop and test robotic applications in a simulated environment. If you don't have access to a Pi or other robot hardware, don't leave just yet! Just set up the base station/dev machine and you will still be able to learn ROS and design robots, then build them physically once you have the components.
The Right Operating System
Each release of ROS is specifically designed to be compatible with a certain release of Ubuntu. For these tutorials we'll be using ROS Foxy Fitzroy (the latest LTS version), which is only properly compatible with computers running Ubuntu 20.04 Focal Fossa (or a derivative). To keep things simple, my example setup will be:
- Base Station/Dev Machine: Desktop running Ubuntu MATE Desktop 20.04 amd64
- On-board: Raspberry Pi running Ubuntu MATE Desktop 20.04 arm64
If you're unfamiliar with the process of installing Linux or imaging an SD card, the following links may help:
- It's FOSS - How to Install Ubuntu Alongside Windows 10 (note that this tutorial covers dual booting, however I recommend a clean install if possible)
- TechRadar - How to install Ubuntu on the Raspberry Pi
Other Useful Software
Now that we have an operating system, we can install some extra software that will be useful for development.
Git
We will be using the popular Git version control software to sync our code between the machines and also double as a backup. We want to install it on both machines.
sudo apt install git
In these tutorials we will assume you have a GitHub account, if not then head over to GitHub and you can make one for free. If you have another Git provider you already use (e.g. GitLab, Bitbucket) then go for it. If for some reason you don't want to use git, you can transfer the files manually - just don't start complaining when you lose track of things!
VSCode
We will want to install an editor or IDE on the dev PC to make the development process easier. In my experience, VS Code is currently the best tool available for this. In addition to being free and easy-to-use, it has a huge range of extensions available to suit different development styles. We want to install this on the dev machine, although you can install it on the Pi too if you like.
sudo snap install --classic code
Note, VS Code also has an excellent Remote Development feature which will allow you to edit files on the Pi using VS Code on the dev machine. These tutorials won't cover this feature, however I strongly recommend you set it up (official instructions https://code.visualstudio.com/docs/remote/ssh) as it will save you some hassle down the track.
Arduino IDE
Some future tutorials will involve communication between the Pi and an Arduino device. To program the Arduino we will need to download and install the official IDE. Depending on your preference, you may want to install it on the Pi, the dev machine, or both. Using the dev machine will be the simplest interface, however it will require fiddling with cables whenever you want to reprogram.
Head over to the Arduino Linux Guide and follow the instructions, ensuring you use the "64" and "ARM 64" builds for the dev machine and Pi, respectively.
Other Useful Tools
As we embark on this journey of building our own robots, some other tools that will come in useful are:
- 12V Bench Power Supply
- Battery charger
- Multimeter
- Soldering iron and solder
- Various crimp tools and their connectors (bootlace, spade, JST, etc.)
- Various screwdrivers
- Rotary Tool/Dremel (hand tools or other power tools can also be used)
- 3D Printer (this one is definitely optional, you can easily build most projects with no 3D-printed parts)
- Portable keyboard/mouse/screen (very optional)
- Fasteners and adhesives (cable ties, screws, bolts, tape, etc.)
What Next?
Now that we have our computers set up, we are ready to install ROS, but first it is worth taking some time to tweak our network configuration.
Also, for more information on running Linux and Windows on the same computer, check out this post.
References/Credits
Raspberry Pi 4 Image by SparkFun, licensed under CC BY 2.0
Laptop Image by Tymon Oziemblewski from Pixabay